
3 配置 - Reference Documentation
Authors: Graeme Rocher, Peter Ledbrook, Marc Palmer, Jeff Brown, Luke Daley, Burt Beckwith
Version: null
Table of Contents
3 配置
It may seem odd that in a framework that embraces "convention-over-configuration" that we tackle this topic now, but since what configuration there is typically a one-off, it is best to get it out the way.With Grails' default settings you can actually develop an application without doing any configuration whatsoever. Grails ships with an embedded servlet container and in-memory H2 database, so there isn't even a database to set up.However, typically you should configure a more robust database at some point and that is described in the following section.
也许在这里谈论配置对于一个遵循“规约优于配置”的框架来说,会让人感到比较奇怪,但是实际上我们这里所说的配置是两个不同的概念,请不要混淆。实际上Grails的默认配置已经足以我们进行开发,并且它内置了容器和内存模式的H2数据库,这样我们几乎连数据库都不用配置了。不过,在将来你肯定是想要配置一个真正的数据库的,下面的章节将介绍如何实现。
3.1 基本配置
For general configuration Grails provides a file called Then later in your application you can access these settings in one of two ways. The most common is from the GrailsApplication object, which is available as a variable in controllers and tag libraries:The other way involves getting a reference to the ConfigurationHolder class that holds a reference to the configuration object:
Grails提供了一个 grails-app/conf/Config.groovy. This file uses Groovy's ConfigSlurper which is very similar to Java properties files except it is pure Groovy hence you can reuse variables and use proper Java types!You can add your own configuration in here, for example:foo.bar.hello = "world"assert "world" == grailsApplication.config.foo.bar.helloimport org.codehaus.groovy.grails.commons.* … def config = ConfigurationHolder.config assert "world" == config.foo.bar.hello
ConfigurationHolder and ApplicationHolder are deprecated and will be removed in a future version of Grails, so it is highly preferable to access theGrailsApplicationand config from thegrailsApplicationvariable.
grails-app/conf/Config.groovy 配置文件,用来完成通用的配置。此文件除了是Groovy的ConfigSlurper 之外,其他非常类似于Java属性文件,这样就既可以重用变量又可以使用合适的Java类!你可以添加属于你自己的配置信息,例如:foo.bar.hello = "world"assert "world" == grailsApplication.config.foo.bar.helloimport org.codehaus.groovy.grails.commons.* … def config = ConfigurationHolder.config assert "world" == config.foo.bar.hello
ConfigurationHolder和ApplicationHolder现在已经被废弃,并且将在Grails的未来版本中移除,因此强烈推荐采用GrailsApplication的实例变量grailsApplication方式来访问配置对象。
3.1.1 内置选项
Grails also provides the following configuration options:
Grails同样提供了如下配置选项:
grails.config.locations- The location of properties files or addition Grails Config files that should be merged with main configurationgrails.enable.native2ascii- Set this to false if you do not require native2ascii conversion of Grails i18n properties filesgrails.views.default.codec- Sets the default encoding regime for GSPs - can be one of 'none', 'html', or 'base64' (default: 'none'). To reduce risk of XSS attacks, set this to 'html'.grails.views.gsp.encoding- The file encoding used for GSP source files (default is 'utf-8')grails.mime.file.extensions- Whether to use the file extension to dictate the mime type in Content Negotiationgrails.mime.types- A map of supported mime types used for Content Negotiationgrails.serverURL- A string specifying the server URL portion of absolute links, including server name e.g. grails.serverURL="http://my.yourportal.com". See createLink.
grails.config.locations- 配置文件的位置,包括属性文件或者其他需要合并到主配置的Grails配置文件grails.enable.native2ascii- 如果不需要native2ascii来转化Grails i18n属性文件的话,将该选项设为falsegrails.views.default.codec- 设置GSP的默认编码制式,可以是:'none', 'html', 或者 'base64' (缺省为'none'). 为了减少XSS攻击的风险,建议设置成'html'.grails.views.gsp.encoding- GSP源文件的字符编码(缺省是'utf-8')grails.mime.file.extensions- 是否使用文件的扩展名表示内容协商中的媒体类型(mime type)grails.mime.types- 内容协商所支持的媒体类型grails.serverURL- 一个指向服务器URL的绝对地址,包括服务器名称,比如grails.serverURL="http://my.yourportal.com". 详细请看createLink。
War generation
grails.project.war.file- Sets the name and location of the WAR file generated by the war commandgrails.war.dependencies- A closure containing Ant builder syntax or a list of JAR filenames. Lets you customise what libaries are included in the WAR file.grails.war.copyToWebApp- A closure containing Ant builder syntax that is legal inside an Ant copy, for example "fileset()". Lets you control what gets included in the WAR file from the "web-app" directory.grails.war.resources- A closure containing Ant builder syntax. Allows the application to do any other other work before building the final WAR file
War生成选项
grails.project.war.file- 设置 war 命令生成WAR文件的名称和位置grails.war.dependencies- 符合Ant生成器语法的闭包或者JAR文件的列表,让你可以定制WAR文件所需要的依赖库。grails.war.copyToWebApp- 完成Ant拷贝且满足其生成器语法的闭包,比如"fileset()"。让你控制"web-app"目录下那些资源可以被打包到WAR文件中。grails.war.resources- 符合Ant生成器语法的闭包,运行应用在构建最终的WAR文件前做任何其他的预处理
3.1.2 日志
The Basics
Grails uses its common configuration mechanism to provide the settings for the underlying Log4j log system, so all you have to do is add alog4j setting to the file grails-app/conf/Config.groovy.So what does this log4j setting look like? Here's a basic example:log4j = {
error 'org.codehaus.groovy.grails.web.servlet', // controllers
'org.codehaus.groovy.grails.web.pages' // GSP warn 'org.apache.catalina'
}基础
Grails利用其自身的配置机制来提供对 Log4j 日志系统的配置,因此你所需要做的只是将log4j配置添加到grails-app/conf/Config.groovy配置文件中。那么log4j该配置什么样子呢?下边是一个基础的示例:log4j = {
error 'org.codehaus.groovy.grails.web.servlet', // controllers
'org.codehaus.groovy.grails.web.pages' // GSP warn 'org.apache.catalina'
}Logging levels
The are several standard logging levels, which are listed here in order of descending priority:- off
- fatal
- error
- warn
- info
- debug
- trace
- all
log.error(msg) will log a message at the 'error' level. Likewise, log.debug(msg) will log it at 'debug'. Each of the above levels apart from 'off' and 'all' have a corresponding log method of the same name.The logging system uses that message level combined with the configuration for the logger (see next section) to determine whether the message gets written out. For example, if you have an 'org.example.domain' logger configured like so:warn 'org.example.domain'
日志级别
以下是按照优先级降序(由高到低)排列的标准日志级别:- off
- fatal
- error
- warn
- info
- debug
- trace
- all
log.error(msg)方法,就是使用其'error'级别,同理log.debug(msg)指定的是'debug'。上述从'off'到'all'的级别都有一个同名对应的日志方法。日志系统使用记录器(介绍见下一节)配置的 message 级别来判断此消息是否应该输出,比如你有一个'org.example.domain'记录器,其配置如下:warn 'org.example.domain'
Loggers
Loggers are fundamental to the logging system, but they are a source of some confusion. For a start, what are they? Are they shared? How do you configure them?A logger is the object you log messages to, so in the calllog.debug(msg), log is a logger instance (of type Log). These loggers are cached and uniquely identified by name, so if two separate classes use loggers with the same name, those loggers are actually the same instance.There are two main ways to get hold of a logger:
- use the
loginstance injected into artifacts such as domain classes, controllers and services; - use the Commons Logging API directly.
log property, then the name of the logger is 'grails.app.<type>.<className>', where type is the type of the artifact, for example 'controller' or 'service, and className is the fully qualified name of the artifact. For example, if you have this service:package org.exampleclass MyService {
…
}package org.otherimport org.apache.commons.logging.LogFactoryclass MyClass { private static final log = LogFactory.getLog(this) … }
getLog() method, such as "myLogger", but this is less common because the logging system treats names with dots ('.') in a special way.
记录器(Loggers)
记录器是日志系统的基础,但是依然有一些根源上的困惑,比如它们是什么?可否共享?以及如何配置它们?一个记录器就是你要将信息记录进去的对象,因此log.debug(msg)中的log就是一个记录器实例(其类型是Log). 这些记录器通过唯一的名字标识被缓存起来,因此如果两个不同的类使用同一个名字的记录器,那么这些记录器是同一个运行实例。主要有两种方法来获取一个记录器:
- 使用注入到工件(比如领域类、控制器以及服务)中的
log实例 - 直接使用Commons Logging API。
log属性,那么记录器的名字是'grails.app.<type>.<className>',此处的type是工件的类型,比如'controller'或者'service',而className则是此工件的全名,假设你有如下的一个服务:package org.exampleclass MyService {
…
}package org.otherimport org.apache.commons.logging.LogFactoryclass MyClass { private static final log = LogFactory.getLog(this) … }
getLog()方法,但是这种用法并不常见,因为在日志系统中,名字中的点('.')是被特殊处理的。Configuring loggers
You have already seen how to configure loggers in Grails:log4j = {
error 'org.codehaus.groovy.grails.web.servlet'
}org.codehaus.groovy.grails.web.servlet.GrailsDispatcherServlet class and the org.codehaus.groovy.grails.web.servlet.mvc.GrailsWebRequest one.In other words, loggers are hierarchical. This makes configuring them by package much simpler than it would otherwise be.The most common things that you will want to capture log output from are your controllers, services, and other artifacts. Use the convention mentioned earlier to do that: grails.app.<artifactType>.<className> . In particular the class name must be fully qualifed, i.e. with the package if there is one:log4j = {
// Set level for all application artifacts
info "grails.app" // Set for a specific controller in the default package
debug "grails.app.controllers.YourController" // Set for a specific domain class
debug "grails.app.domain.org.example.Book" // Set for all taglibs
info "grails.app.taglib"
}conf- For anything undergrails-app/confsuch asBootStrap.groovy(but excluding filters)filters- For filterstaglib- For tag librariesservices- For service classescontrollers- For controllersdomain- For domain entities
org.codehaus.groovy.grails.commons- Core artifact information such as class loading etc.org.codehaus.groovy.grails.web- Grails web request processingorg.codehaus.groovy.grails.web.mapping- URL mapping debuggingorg.codehaus.groovy.grails.plugins- Log plugin activitygrails.spring- See what Spring beans Grails and plugins are definingorg.springframework- See what Spring is doingorg.hibernate- See what Hibernate is doing
配置记录器
你已在Grails中看到如何配置记录器了,比如:log4j = {
error 'org.codehaus.groovy.grails.web.servlet'
}org.codehaus.groovy.grails.web.servlet.GrailsDispatcherServlet和org.codehaus.groovy.grails.web.servlet.mvc.GrailsWebRequest。换句话说,记录器是分层级的,这使得用包名来配置比其他方式容易很多。在应用中,你最常记录的是控制器、服务以及其他工件的输出日志,这可以通过以前提到过的_grails.app.<artifactType>.<className>_来实现。需要注意的是类名必须是全名(包括包名),如下所示:log4j = {
// Set level for all application artifacts
info "grails.app" // Set for a specific controller in the default package
debug "grails.app.controllers.YourController" // Set for a specific domain class
debug "grails.app.domain.org.example.Book" // Set for all taglibs
info "grails.app.taglib"
}conf-grails-app/conf下的任何类(过滤器除外),比如:BootStrap.groovyfilters- 过滤器taglib- 标签库services- 服务类controllers- 控制器domain- 领域类
org.codehaus.groovy.grails.commons- 核心工件信息,比如类加载等org.codehaus.groovy.grails.web- Grails的web请求处理org.codehaus.groovy.grails.web.mapping- 调试URL映射信息org.codehaus.groovy.grails.plugins- 记录插件的活动情况grails.spring- 在Grails和插件中定义的Spring的beansorg.springframework- Spring的活动情况org.hibernate- Hibernate的活动情况
The Root Logger
All logger objects inherit their configuration from the root logger, so if no explicit configuration is provided for a given logger, then any messages that go to that logger are subject to the rules defined for the root logger. In other words, the root logger provides the default configuration for the logging system.Grails automatically configures the root logger to only handle messages at 'error' level and above, and all the messages are directed to the console (stdout for those with a C background). You can customise this behaviour by specifying a 'root' section in your logging configuration like so:log4j = {
root {
info()
}
…
}log4j = {
appenders {
file name:'file', file:'/var/logs/mylog.log'
}
root {
debug 'stdout', 'file'
}
}org.apache.log4j.Logger instance is passed as an argument to the log4j closure. This lets you work with the logger directly:log4j = { root ->
root.level = org.apache.log4j.Level.DEBUG
…
}Logger instance, refer to the Log4j API documentation.Those are the basics of logging pretty well covered and they are sufficient if you're happy to only send log messages to the console. But what if you want to send them to a file? How do you make sure that messages from a particular logger go to a file but not the console? These questions and more will be answered as we look into appenders.
根记录器
所有的记录器对象配置都是从其根记录器继承而来的,因此一个记录器如果没有明确地配置,那么此记录器的任何消息规则都使用其根记录器的定义。或者说,根记录器提供日志系统的缺省配置。Grails自动地将根记录器配置成只处理'error'级别地消息,并且将这些消息显示在命令行终端(stdout是从C语言中借鉴而来)中。你可以通过'root'来重新定义其行为,比如:log4j = {
root {
info()
}
…
}log4j = {
appenders {
file name:'file', file:'/var/logs/mylog.log'
}
root {
debug 'stdout', 'file'
}
}org.apache.log4j.Logger实例,这让你可以直接操作logger:log4j = { root ->
root.level = org.apache.log4j.Level.DEBUG
…
}Logger实例的信息,请参考Log4j API文档。如果你仅仅满足于将日志信息输出到字符终端,那么目前所涉及到的基本信息已经足够用的了。但是如果你还想输出到一个文件呢?以及想将特定记录器的信息输出到一个特定文件,而不是字符终端,又该如何做呢?这些疑问将在下一节的输出器中得到解答。Appenders
Loggers are a useful mechanism for filtering messages, but they don't physically write the messages anywhere. That's the job of the appender, of which there are various types. For example, there is the default one that writes messages to the console, another that writes them to a file, and several others. You can even create your own appender implementations!This diagram shows how they fit into the logging pipeline: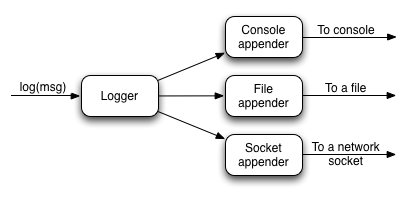 As you can see, a single logger may have several appenders attached to it. In a standard Grails configuration, the console appender named 'stdout' is attached to all loggers through the default root logger configuration. But that's the only one. Adding more appenders can be done within an 'appenders' block:
log4j = {
    appenders {
        rollingFile name: "myAppender",
                    maxFileSize: 1024,
                    file: "/tmp/logs/myApp.log"
    }
}| Name | Class | Description |
|---|---|---|
| jdbc | JDBCAppender | Logs to a JDBC connection. |
| console | ConsoleAppender | Logs to the console. |
| file | FileAppender | Logs to a single file. |
| rollingFile | RollingFileAppender | Logs to rolling files, for example a new file each day. |
name, maxFileSize and file properties of the RollingFileAppender instance.You can have as many appenders as you like - just make sure that they all have unique names. You can even have multiple instances of the same appender type, for example several file appenders that log to different files.If you prefer to create the appender programmatically or if you want to use an appender implementation that's not available in the above syntax, simply declare an appender entry with an instance of the appender you want:import org.apache.log4j.*log4j = { appenders { appender new RollingFileAppender( name: "myAppender", maxFileSize: 1024, file: "/tmp/logs/myApp.log") } }
JMSAppender, SocketAppender, SMTPAppender, and more.Once you have declared your extra appenders, you can attach them to specific loggers by passing the name as a key to one of the log level methods from the previous section:error myAppender: "grails.app.controllers.BookController"error myAppender: "grails.app.controllers.BookController", myFileAppender: ["grails.app.controllers.BookController", "grails.app.services.BookService"], rollingFile: "grails.app.controllers.BookController"
myFileAppender) by using a list.Be aware that you can only configure a single level for a logger, so if you tried this code:error myAppender: "grails.app.controllers.BookController" debug myFileAppender: "grails.app.controllers.BookController" fatal rollingFile: "grails.app.controllers.BookController"
log4j = {
    appenders {
        console name: "stdout", threshold: org.apache.log4j.Level.INFO
    }
}threshold argument which determines the cut-off for log messages. This argument is available for all appenders, but do note that you currently have to specify a Level instance - a string such as "info" will not work.
输出器(Appenders)
记录器是很好的信息过滤机制,但是它们并不将信息进行任何物理的写操作,这些都是不同类型的输出器所做的事。比如缺省的一个就是将信息输出到字符终端,另外一个输出到一个文件等等,更有甚者,你还可以创建你自己的输出器!下图展示了输出器在日志管道系统中的位置:如你所见,一个记录器可以挂载多个输出器。 在一个标准的Grails配置中,所有从根记录器而来的记录器都有一个名为'stdout'并唯一的字符终端输出器。你可以通过'appenders'代码块来增加更多的输出器,比如:log4j = {
appenders {
rollingFile name: "myAppender",
maxFileSize: 1024,
file: "/tmp/logs/myApp.log"
}
}| 名称 | 类名 | 描述 |
|---|---|---|
| jdbc | JDBCAppender | 记录到JDBC连接。 |
| console | ConsoleAppender | 记录到字符终端。 |
| file | FileAppender | 记录到一个文件。 |
| rollingFile | RollingFileAppender | 记录到滚动文件,比如一天一个新文件。 |
RollingFileAppender的实例中,name、maxFileSize和file都是其属性而已。你可以添加任意你需要的输出器,只要确保它们的名字不重复就可以了。同一类型的输出器,你甚至还可以有多个实例,比如将日志内容输出到不同的文件中。你如果倾向于手工创建输出器或者你需要的输出器不在上述的列表中,那么你只需简单的声明一个appender代码即可,比如:import org.apache.log4j.*log4j = { appenders { appender new RollingFileAppender( name: "myAppender", maxFileSize: 1024, file: "/tmp/logs/myApp.log") } }
JMSAppender、SocketAppender和SMTPAppender等输出器。一旦你声明了这些额外的输出器,那么你还需要将它们跟特定的记录器进行关联,这可以通过记录器的名称和记录级别来完成,比如:error myAppender: "grails.app.controllers.BookController"error myAppender: "grails.app.controllers.BookController", myFileAppender: ["grails.app.controllers.BookController", "grails.app.services.BookService"], rollingFile: "grails.app.controllers.BookController"
myFileAppender)中如何通过列表来配置多个记录器。需要注意的是:一个记录器只能配置一个级别,如果你配置了如下的内容:error myAppender: "grails.app.controllers.BookController" debug myFileAppender: "grails.app.controllers.BookController" fatal rollingFile: "grails.app.controllers.BookController"
log4j = {
    appenders {
        console name: "stdout", threshold: org.apache.log4j.Level.INFO
    }
}threshold参数用以判断那些消息需要截去。此参数对所有的输出器有效,但需要注意的是你必须使用Level实例-"info"字符串的便利用法不能工作。Custom Layouts
By default the Log4j DSL assumes that you want to use a PatternLayout. However, there are other layouts available including:xml- Create an XML log filehtml- Creates an HTML log filesimple- A simple textual logpattern- A Pattern layout
layout setting:log4j = {
appenders {
console name: "customAppender",
layout: pattern(conversionPattern: "%c{2} %m%n")
}
}log4j = {
appenders {
console name: "stdout",
layout: pattern(conversionPattern: "%c{2} %m%n")
}
}自定义布局
多数情况下,Log4j DSL使用缺省的PatternLayout,除此之外,还有以下布局可以选择:xml- 创建一个XML日志文件html- 创建一个HTML日志文件simple- 简单的文本文件pattern- Pattern布局的文件
layout来给一个输出器自定义布局:log4j = {
appenders {
console name: "customAppender",
layout: pattern(conversionPattern: "%c{2} %m%n")
}
}log4j = {
appenders {
console name: "stdout",
layout: pattern(conversionPattern: "%c{2} %m%n")
}
}Environment-specific configuration
Since the logging configuration is insideConfig.groovy, you can put it inside an environment-specific block. However, there is a problem with this approach: you have to provide the full logging configuration each time you define the log4j setting. In other words, you cannot selectively override parts of the configuration - it's all or nothing.To get around this, the logging DSL provides its own environment blocks that you can put anywhere in the configuration:log4j = {
appenders {
console name: "stdout",
layout: pattern(conversionPattern: "%c{2} %m%n") environments {
production {
rollingFile name: "myAppender", maxFileSize: 1024,
file: "/tmp/logs/myApp.log"
}
}
} root {
//…
} // other shared config
info "grails.app.controllers" environments {
production {
// Override previous setting for 'grails.app.controllers'
error "grails.app.controllers"
}
}
}root definition, but you can put the root definition inside an environment block.
特定环境的配置
既然日志是配置在Config.groovy中,你自然也就可以将其配置在环境相关的代码块中。不过这种方式有一个小问题:每次你配置log4j的时候,你必须提供完整的日志配置。或者换句话说,你不能选择性的覆盖部分配置-要么全覆盖要么一点也不覆盖。为了避免此问题,日志DSL提供了自己的environment代码块配置,这样你就可以自由的配置了。log4j = {
appenders {
console name: "stdout",
layout: pattern(conversionPattern: "%c{2} %m%n") environments {
production {
rollingFile name: "myAppender", maxFileSize: 1024,
file: "/tmp/logs/myApp.log"
}
}
} root {
//…
} // other shared config
info "grails.app.controllers" environments {
production {
// Override previous setting for 'grails.app.controllers'
error "grails.app.controllers"
}
}
}root定义的_内部_,但是你可以将其放在environment代码块中。Full stacktraces
When exceptions occur, there can be an awful lot of noise in the stacktrace from Java and Groovy internals. Grails filters these typically irrelevant details and restricts traces to non-core Grails/Groovy class packages.When this happens, the full trace is always logged to theStackTrace logger, which by default writes its output to a file called stacktrace.log. As with other loggers though, you can change its behaviour in the configuration. For example if you prefer full stack traces to go to the console, add this entry:error stdout: "StackTrace"log4j = {
appenders {
rollingFile name: "stacktrace", maxFileSize: 1024,
file: "/var/tmp/logs/myApp-stacktrace.log"
}
}log4j = {
appenders {
'null' name: "stacktrace"
}
}grails.full.stacktrace VM property to true:grails -Dgrails.full.stacktrace=true run-app完整的栈跟踪
当一个异常发生时,可能有大量的来自Java和Groovy内部栈跟踪信息,这其实是很恼人的。Grails的过滤器将这些不相干的细节屏蔽了,并且将栈的跟踪信息限制非Grails/Groovy的类包范围。当异常发生时,完整的跟踪信息总是被记录到StackTrace记录器中,此记录器缺省将内容输出到一个名为stacktrace.log的文件中。跟其他的记录器配合,你还可以改变其在配置中的行为,比如你可以将栈跟踪信息输出到字符终端:error stdout: "StackTrace"log4j = {
appenders {
rollingFile name: "stacktrace", maxFileSize: 1024,
file: "/var/tmp/logs/myApp-stacktrace.log"
}
}log4j = {
appenders {
'null' name: "stacktrace"
}
}grails.full.stacktrace为true来实现,比如:grails -Dgrails.full.stacktrace=true run-appMasking Request Parameters From Stacktrace Logs
When Grails logs a stacktrace, the log message may include the names and values of all of the request parameters for the current request. To mask out the values of secure request parameters, specify the parameter names in thegrails.exceptionresolver.params.exclude config property:grails.exceptionresolver.params.exclude = ['password', 'creditCard']
grails.exceptionresolver.logRequestParameters config property to false. The default value is true when the application is running in DEVELOPMENT mode and false for all other modes.grails.exceptionresolver.logRequestParameters=false屏蔽栈跟踪日志中的请求参数
当Grails记录栈跟踪信息的时候,有可能将当前请求参数的名称和值一并包含了。为了避免隐私信息被记录,可以通过设置grails.exceptionresolver.params.exclude来屏蔽那些有关隐私字段的名称,比如:grails.exceptionresolver.params.exclude = ['password', 'creditCard']
grails.exceptionresolver.logRequestParameters为false的方式来禁止掉。其运行于“开发”模式下,缺省值是true,除此之外的其他模式为false。grails.exceptionresolver.logRequestParameters=falseLogger inheritance
Earlier, we mentioned that all loggers inherit from the root logger and that loggers are hierarchical based on '.'-separated terms. What this means is that unless you override a parent setting, a logger retains the level and the appenders configured for that parent. So with this configuration:log4j = {
appenders {
file name:'file', file:'/var/logs/mylog.log'
}
root {
debug 'stdout', 'file'
}
}log4j = {
appenders {
…
}
root {
…
} info additivity: false
stdout: ["grails.app.controllers.BookController",
"grails.app.services.BookService"]
}info additivity: false, ["grails.app.controllers.BookController", "grails.app.services.BookService"]
记录器的继承
早期,我们提到过所有的记录器都是从跟记录器继承而来的,其继承的层次是通过'.'来分割的。这意味着一个记录器将一直使用其上一级的级别和输出器配置,当然了你覆盖除外。以如下配置为例:log4j = {
appenders {
file name:'file', file:'/var/logs/mylog.log'
}
root {
debug 'stdout', 'file'
}
}log4j = {
appenders {
…
}
root {
…
} info additivity: false
stdout: ["grails.app.controllers.BookController",
"grails.app.services.BookService"]
}info additivity: false, ["grails.app.controllers.BookController", "grails.app.services.BookService"]
Customizing stack trace printing and filtering
Stacktraces in general and those generated when using Groovy in particular are quite verbose and contain many stack frames that aren't interesting when diagnosing problems. So Grails uses a implementation of theorg.codehaus.groovy.grails.exceptions.StackTraceFilterer interface to filter out irrelevant stack frames. To customize the approach used for filtering, implement that interface in a class in src/groovy or src/java and register it in Config.groovy:grails.logging.stackTraceFiltererClass =
'com.yourcompany.yourapp.MyStackTraceFilterer'org.codehaus.groovy.grails.exceptions.StackTracePrinter interface in a class in src/groovy or src/java and register it in Config.groovy:grails.logging.stackTracePrinterClass =
'com.yourcompany.yourapp.MyStackTracePrinter'org.codehaus.groovy.grails.web.errors.ErrorsViewStackTracePrinter and it's registered as a Spring bean. To use your own implementation, either implement the org.codehaus.groovy.grails.exceptions.StackTraceFilterer directly or subclass ErrorsViewStackTracePrinter and register it in grails-app/conf/spring/resources.groovy as:import com.yourcompany.yourapp.MyErrorsViewStackTracePrinterbeans = { errorsViewStackTracePrinter(MyErrorsViewStackTracePrinter,
ref('grailsResourceLocator'))
}自定义栈跟踪的输出和过滤
总的来说,Groovy生成的那些特定栈跟踪信息是比较冗余的,并且对于诊断问题也造成不少的干扰。因此Grails使用org.codehaus.groovy.grails.exceptions.StackTraceFilterer接口来完成对不相关信息的过滤。要完成对特定信息的过滤,只需要再src/groovy或者src/java中实现上述接口,并且在Config.groovy注册一下即可:grails.logging.stackTraceFiltererClass =
'com.yourcompany.yourapp.MyStackTraceFilterer'org.codehaus.groovy.grails.exceptions.StackTracePrinter接口,并且在Config.groovy中注册即可:grails.logging.stackTracePrinterClass =
'com.yourcompany.yourapp.MyStackTracePrinter'org.codehaus.groovy.grails.web.errors.ErrorsViewStackTracePrinter,并且被注册为一个Spring服务。你也可以通过实现org.codehaus.groovy.grails.exceptions.StackTraceFilterer接口或者定义ErrorsViewStackTracePrinter的子类来实现属于自己的渲染器,并且将其在grails-app/conf/spring/resources.groovy中注册,如下:import com.yourcompany.yourapp.MyErrorsViewStackTracePrinterbeans = { errorsViewStackTracePrinter(MyErrorsViewStackTracePrinter,
ref('grailsResourceLocator'))
}Alternative logging libraries
By default, Grails uses Log4J to do its logging. For most people this is absolutely fine, and many users don't even care what logging library is used. But if you're not one of those and want to use an alternative, such as the JDK logging package or logback, you can do so by simply excluding a couple of dependencies from the global set and adding your own:grails.project.dependency.resolution = {
inherits("global") {
excludes "grails-plugin-logging", "log4j"
}
…
dependencies {
runtime "ch.qos.logback:logback-core:0.9.29"
…
}
…
}替换日志框架
缺省情况下,Grails使用Log4J来完成日志操作。对大多数的人来说,这绝对绰绰有余,而且很多的用户也根本就不关心使用那个日志框架。但是,如果你不是那些大多数,并且确实很想使用另外一个替代品,比如JDK自带的日志包或者logback。这时候,你只需要简单地全局设置中排除一些依赖,并且添加你自己地依赖即可,比如:grails.project.dependency.resolution = {
inherits("global") {
excludes "grails-plugin-logging", "log4j"
}
…
dependencies {
runtime "ch.qos.logback:logback-core:0.9.29"
…
}
…
}3.1.3 配置GORM
Grails provides the following GORM configuration options:
and to enable failOnError for domain classes by package:
Grails提供了如下的GORM配置选项:
grails.gorm.failOnError- If set totrue, causes thesave()method on domain classes to throw agrails.validation.ValidationExceptionif validation fails during a save. This option may also be assigned a list of Strings representing package names. If the value is a list of Strings then the failOnError behavior will only be applied to domain classes in those packages (including sub-packages). See the save method docs for more information.
grails.gorm.failOnError=truegrails.gorm.failOnError = ['com.companyname.somepackage',
'com.companyname.someotherpackage']grails.gorm.failOnError- 如果此选项值为true并且在保存的时候 校验 失败,那么此领域类的save()方法将抛出一个grails.validation.ValidationException异常。此选项的值还可以是代表包名的字符串列表。如果是字符串列表的话,那么failOnError仅仅作用于属于这些包名(包括子包名)的领域类。更多详细信息请参考 save 方法
grails.gorm.failOnError=truegrails.gorm.failOnError = ['com.companyname.somepackage',
'com.companyname.someotherpackage']grails.gorm.autoFlush= 如果此选项值为true,那么将导致 merge、 save 和 delete 方法不需要明确地指定flush参数(比如save(flush: true))而清除会话的行为。
3.2 环境
Per Environment Configuration
Grails supports the concept of per environment configuration. TheConfig.groovy, DataSource.groovy, and BootStrap.groovy files in the grails-app/conf directory can use per-environment configuration using the syntax provided by ConfigSlurper. As an example consider the following default DataSource definition provided by Grails:dataSource {
pooled = false
driverClassName = "org.h2.Driver"
username = "sa"
password = ""
}
environments {
development {
dataSource {
dbCreate = "create-drop"
url = "jdbc:h2:mem:devDb"
}
}
test {
dataSource {
dbCreate = "update"
url = "jdbc:h2:mem:testDb"
}
}
production {
dataSource {
dbCreate = "update"
url = "jdbc:h2:prodDb"
}
}
}environments block specifies per environment settings for the dbCreate and url properties of the DataSource.
不同环境(Per Environment)配置
Grails支持不同环境配置的概念。grails-app/conf目录下的Config.groovy、DataSource.groovy和BootStrap.groovy文件都支持 ConfigSlurper 语法的不同环境配置。Grails自带的缺省DataSource定义,就是一个很好的示例:dataSource {
pooled = false
driverClassName = "org.h2.Driver"
username = "sa"
password = ""
}
environments {
development {
dataSource {
dbCreate = "create-drop"
url = "jdbc:h2:mem:devDb"
}
}
test {
dataSource {
dbCreate = "update"
url = "jdbc:h2:mem:testDb"
}
}
production {
dataSource {
dbCreate = "update"
url = "jdbc:h2:prodDb"
}
}
}environments代码块中DataSource的dbCreate和url属性。Packaging and Running for Different Environments
Grails' command line has built in capabilities to execute any command within the context of a specific environment. The format is:grails [environment] [command name]
dev, prod, and test for development, production and test. For example to create a WAR for the test environment you wound run:grails test war
grails.env variable to any command:grails -Dgrails.env=UAT run-app
不同环境下的运行和打包
Grails的命令行中内置了特定环境下执行命令的能力,其格式为:grails [environment] [command name]
dev、prod和test,分别代表了开发、生产和测试环境。比如,要创建test环境的WAR,可以运行如下命令:grails test war
grails.env变量:grails -Dgrails.env=UAT run-app
Programmatic Environment Detection
Within your code, such as in a Gant script or a bootstrap class you can detect the environment using the Environment class:import grails.util.Environment...switch (Environment.current) { case Environment.DEVELOPMENT: configureForDevelopment() break case Environment.PRODUCTION: configureForProduction() break }
可编程的环境检测
在你的代码中,比如Gant脚本或者启动类,你通过Environment类可以检测到当前的环境,比如:import grails.util.Environment...switch (Environment.current) { case Environment.DEVELOPMENT: configureForDevelopment() break case Environment.PRODUCTION: configureForProduction() break }
Per Environment Bootstrapping
Its often desirable to run code when your application starts up on a per-environment basis. To do so you can use thegrails-app/conf/BootStrap.groovy file's support for per-environment execution:def init = { ServletContext ctx ->
environments {
production {
ctx.setAttribute("env", "prod")
}
development {
ctx.setAttribute("env", "dev")
}
}
ctx.setAttribute("foo", "bar")
}不同环境下的启动
通常你的应用启动时,需要根据不同的环境运行相应的代码,为此你可以使用grails-app/conf/BootStrap.groovy文件来执行不同环境下的处理:def init = { ServletContext ctx ->
environments {
production {
ctx.setAttribute("env", "prod")
}
development {
ctx.setAttribute("env", "dev")
}
}
ctx.setAttribute("foo", "bar")
}Generic Per Environment Execution
The previousBootStrap example uses the grails.util.Environment class internally to execute. You can also use this class yourself to execute your own environment specific logic:Environment.executeForCurrentEnvironment {
production {
// do something in production
}
development {
// do something only in development
}
}不同环境下的通用处理
在以前的BootStrap示例中,我们使用grails.util.Environment类做了内部处理。你也可以通过此类来执行特定环境中的逻辑,比如:Environment.executeForCurrentEnvironment {
production {
// do something in production
}
development {
// do something only in development
}
}3.3 数据源
Since Grails is built on Java technology setting up a data source requires some knowledge of JDBC (the technology that doesn't stand for Java Database Connectivity).If you use a database other than H2 you need a JDBC driver. For example for MySQL you would need Connector/JDrivers typically come in the form of a JAR archive. It's best to use Ivy to resolve the jar if it's available in a Maven repository, for example you could add a dependency for the MySQL driver like this:Note that the built-in Example of advanced configuration using extra properties:
既然Grails是基于Java技术来设置数据源的,那么一些JDBC的知识是必不可少的。如果你的数据库并非H2,那么你至少还需要一个JDBC驱动。以MySQL为例,你需要下载Connector/J驱动通常打包成JAR。如果你需要的jar在Maven的存储库中存在,那么最好是通过Ivy来解析它们,比如下面是对MySQL驱动的依赖:grails.project.dependency.resolution = {
inherits("global")
log "warn"
repositories {
grailsPlugins()
grailsHome()
grailsCentral()
mavenCentral()
}
dependencies {
runtime 'mysql:mysql-connector-java:5.1.16'
}
}mavenCentral() repository is included here since that's a reliable location for this library.If you can't use Ivy then just put the JAR in your project's lib directory.Once you have the JAR resolved you need to get familiar Grails' DataSource descriptor file located at grails-app/conf/DataSource.groovy. This file contains the dataSource definition which includes the following settings:
driverClassName- The class name of the JDBC driverusername- The username used to establish a JDBC connectionpassword- The password used to establish a JDBC connectionurl- The JDBC URL of the databasedbCreate- Whether to auto-generate the database from the domain model - one of 'create-drop', 'create', 'update' or 'validate'pooled- Whether to use a pool of connections (defaults to true)logSql- Enable SQL logging to stdoutformatSql- Format logged SQLdialect- A String or Class that represents the Hibernate dialect used to communicate with the database. See the org.hibernate.dialect package for available dialects.readOnly- Iftruemakes the DataSource read-only, which results in the connection pool callingsetReadOnly(true)on eachConnectionproperties- Extra properties to set on the DataSource bean. See the Commons DBCP BasicDataSource documentation.
dataSource {
    pooled = true
    dbCreate = "update"
    url = "jdbc:mysql://localhost/yourDB"
    driverClassName = "com.mysql.jdbc.Driver"
    dialect = org.hibernate.dialect.MySQL5InnoDBDialect
    username = "yourUser"
    password = "yourPassword"
}
When configuring the DataSource do not include the type or the def keyword before any of the configuration settings as Groovy will treat these as local variable definitions and they will not be processed. For example the following is invalid:
dataSource {
    boolean pooled = true // type declaration results in ignored local variable
    …
}dataSource {
pooled = true
dbCreate = "update"
url = "jdbc:mysql://localhost/yourDB"
driverClassName = "com.mysql.jdbc.Driver"
dialect = org.hibernate.dialect.MySQL5InnoDBDialect
username = "yourUser"
password = "yourPassword"
properties {
maxActive = 50
maxIdle = 25
minIdle = 5
initialSize = 5
minEvictableIdleTimeMillis = 60000
timeBetweenEvictionRunsMillis = 60000
maxWait = 10000
validationQuery = "/* ping */"
}
}grails.project.dependency.resolution = {
inherits("global")
log "warn"
repositories {
grailsPlugins()
grailsHome()
grailsCentral()
mavenCentral()
}
dependencies {
runtime 'mysql:mysql-connector-java:5.1.16'
}
}mavenCentral()存储库,因为此jar包位于其中。如果Ivy找不到,那么只需要将JAR放到你工程的lib目录即可。一旦解决了JAR的问题,你需要来熟悉一下位于grails-app/conf/DataSource.groovy中的Grails数据源描述了。此文件包含如下所述的一些数据源的定义:
driverClassName- JDBC驱动的类名username- 建立JDBC连接的用户名password- 建立JDBC连接的密码url- JDBC数据库的URLdbCreate- 是否根据领域类自动生成数据库-可以是'create-drop'、'create'、'update'或者'validate'pooled- 是否使用连接池(缺省是true)logSql- 是否将SQL输出到字符终端formatSql- 格式化SQLdialect- Hibernate用于跟数据库通讯的方言(dialect),可以是字符串或者类名。可以通过org.hibernate.dialect来查看所支撑的方言。readOnly- 如果是true那么此数据源就是只读的,这是通过调用连接池的Connection的setReadOnly(true)来实现的。properties- 设置数据源的额外属性。更多请参考Commons DBCP的 BasicDataSource文档。
dataSource {
    pooled = true
    dbCreate = "update"
    url = "jdbc:mysql://localhost/yourDB"
    driverClassName = "com.mysql.jdbc.Driver"
    dialect = org.hibernate.dialect.MySQL5InnoDBDialect
    username = "yourUser"
    password = "yourPassword"
}
在配置数据源的时候,不要在配置名前加入任何类型或者def关键字,因为Groovy将其视为一个本地变量定义而将其忽略。比如:
dataSource {
    boolean pooled = true // type declaration results in ignored local variable
    …
}dataSource {
pooled = true
dbCreate = "update"
url = "jdbc:mysql://localhost/yourDB"
driverClassName = "com.mysql.jdbc.Driver"
dialect = org.hibernate.dialect.MySQL5InnoDBDialect
username = "yourUser"
password = "yourPassword"
properties {
maxActive = 50
maxIdle = 25
minIdle = 5
initialSize = 5
minEvictableIdleTimeMillis = 60000
timeBetweenEvictionRunsMillis = 60000
maxWait = 10000
validationQuery = "/* ping */"
}
}More on dbCreate
Hibernate can automatically create the database tables required for your domain model. You have some control over when and how it does this through thedbCreate property, which can take these values:
- create - Drops the existing schemaCreates the schema on startup, dropping existing tables, indexes, etc. first.
- create-drop - Same as create, but also drops the tables when the application shuts down cleanly.
- update - Creates missing tables and indexes, and updates the current schema without dropping any tables or data. Note that this can't properly handle many schema changes like column renames (you're left with the old column containing the existing data).
- validate - Makes no changes to your database. Compares the configuration with the existing database schema and reports warnings.
- any other value - does nothing
dbCreate setting completely, which is recommended once your schema is relatively stable and definitely when your application and database are deployed in production. Database changes are then managed through proper migrations, either with SQL scripts or a migration tool like Liquibase (the Database Migration plugin uses Liquibase and is tightly integrated with Grails and GORM).
关于dbCreate
Hibernate能够根据你的领域类来自动创建数据库表。你可以通过dbCreate属性来进行一些控制,其可选值如下:
- create - 在启动时候,先删除已存在的,包括表、索引等,然后创建。
- create-drop - 同 create,不过在应用关闭的时候,也进行表删除。
- update - 创建不存在的表和索引,并且在不删除表和数据的情况下更新表结构。注意此种情况于很多限制,比如你不能很好地处理重命名字段(旧有地字段依然保留)
- validate - 不改变你数据库地任何信息,只是跟现有地数据库配置脚本进行比较,并且报告一个警告。
- 其他 - 什么都不做
dbCreate完全移除。数据库的变更迁移可以通过SQL脚本或者迁移工具,比如Liquibase(数据库迁移 插件就是通过Liquibase来跟Grails和GORM紧密集成的)来完成。
3.3.1 数据源和环境
The previous example configuration assumes you want the same config for all environments: production, test, development etc.Grails' DataSource definition is "environment aware", however, so you can do:
在前面的配置示例中,不管是在生产、测试还是开发环境中,我们假设所有的配置都是一样的,但是Grails的数据源定义是可以跟环境相关的,因此,你可以象下面的示例那样进行处理:dataSource {
pooled = true
driverClassName = "com.mysql.jdbc.Driver"
dialect = org.hibernate.dialect.MySQL5InnoDBDialect
// other common settings here
}environments {
production {
dataSource {
url = "jdbc:mysql://liveip.com/liveDb"
// other environment-specific settings here
}
}
}dataSource {
pooled = true
driverClassName = "com.mysql.jdbc.Driver"
dialect = org.hibernate.dialect.MySQL5InnoDBDialect
// other common settings here
}environments {
production {
dataSource {
url = "jdbc:mysql://liveip.com/liveDb"
// other environment-specific settings here
}
}
}3.3.2 JNDI数据源
Referring to a JNDI DataSource
Most Java EE containers supplyDataSource instances via Java Naming and Directory Interface (JNDI). Grails supports the definition of JNDI data sources as follows:dataSource {
jndiName = "java:comp/env/myDataSource"
}DataSource in Grails remains the same.
引用JNDI数据源
大部分的Java EE容器支持 Java命名服务接口 (JNDI)的DataSource,Grails也支持如下格式的JNDI数据源定义:dataSource {
jndiName = "java:comp/env/myDataSource"
}DataSource的定义却是保持一致的。Configuring a Development time JNDI resource
The way in which you configure JNDI data sources at development time is plugin dependent. Using the Tomcat plugin you can define JNDI resources using thegrails.naming.entries setting in grails-app/conf/Config.groovy:grails.naming.entries = [
"bean/MyBeanFactory": [
auth: "Container",
type: "com.mycompany.MyBean",
factory: "org.apache.naming.factory.BeanFactory",
bar: "23"
],
"jdbc/EmployeeDB": [
type: "javax.sql.DataSource", //required
auth: "Container", // optional
description: "Data source for Foo", //optional
driverClassName: "org.h2.Driver",
url: "jdbc:h2:mem:database",
username: "dbusername",
password: "dbpassword",
maxActive: "8",
maxIdle: "4"
],
"mail/session": [
type: "javax.mail.Session,
auth: "Container",
"mail.smtp.host": "localhost"
]
]开发环境中配置JNDI资源
在开发环境中,配置JNDI数据源的方式是跟插件相关的。如果你是在用 Tomcat 插件的话,可以通过grails-app/conf/Config.groovy中的grails.naming.entries来配置JNDI资源,比如:grails.naming.entries = [
"bean/MyBeanFactory": [
auth: "Container",
type: "com.mycompany.MyBean",
factory: "org.apache.naming.factory.BeanFactory",
bar: "23"
],
"jdbc/EmployeeDB": [
type: "javax.sql.DataSource", //required
auth: "Container", // optional
description: "Data source for Foo", //optional
driverClassName: "org.h2.Driver",
url: "jdbc:h2:mem:database",
username: "dbusername",
password: "dbpassword",
maxActive: "8",
maxIdle: "4"
],
"mail/session": [
type: "javax.mail.Session,
auth: "Container",
"mail.smtp.host": "localhost"
]
]3.3.3 自动数据库迁移
The
dbCreate property of the DataSource definition is important as it dictates what Grails should do at runtime with regards to automatically generating the database tables from GORM classes. The options are described in the DataSource section:
createcreate-dropupdatevalidate- no value
dbCreate is by default set to "create-drop", but at some point in development (and certainly once you go to production) you'll need to stop dropping and re-creating the database every time you start up your server.It's tempting to switch to update so you retain existing data and only update the schema when your code changes, but Hibernate's update support is very conservative. It won't make any changes that could result in data loss, and doesn't detect renamed columns or tables, so you'll be left with the old one and will also have the new one.Grails supports Rails-style migrations via the Database Migration plugin which can be installed by running
grails install-plugin database-migrationDataSource中的dbCreate属性是很重要的,正如其所暗示,Grails将根据此值和GORM类在运行时来自动生成数据库表。可选项已经在数据源章节中介绍:
createcreate-dropupdatevalidate- 空
dbCreate通常设置为"create-drop",但是当开发到一定程度(更进一步要运行于生产环境),你将不会再采用这种每次启动先删除再创建的方式。当你想保留数据并且只想更新所变化的代码时,可以尝试使用update。不过Hibernate对更新的支撑是非常保守的。其在数据安全方面不能给你任何保证,此外它也不能自动检测到字段或者表的重命名,因此在新增的同时旧有的依然保留。Grails现在支撑Rails风格的数据库迁移了,这是通过安装和运行 Database Migration 插件来实现的。
grails install-plugin database-migration3.3.4 事务感知的数据源代理
The actual or by pulling it from the
dataSource bean is wrapped in a transaction-aware proxy so you will be given the connection that's being used by the current transaction or Hibernate Session if one is active.If this were not the case, then retrieving a connection from the dataSource would be a new connection, and you wouldn't be able to see changes that haven't been committed yet (assuming you have a sensible transaction isolation setting, e.g. READ_COMMITTED or better).The "real" unproxied dataSource is still available to you if you need access to it; its bean name is dataSourceUnproxied.You can access this bean like any other Spring bean, i.e. using dependency injection:class MyService { def dataSourceUnproxied
…
}ApplicationContext:def dataSourceUnproxied = ctx.dataSourceUnproxied
dataSource 实际上只是事务感知代理的封装,因此你得到的数据库连接是来自于当前事务或者当前活动的Hibernate的Session。除此之外,直接从dataSource获取的连接将是一个新连接,你将看不到任何没有提交的变化(假设你设置了事务隔离敏感度,比如READ_COMMITTED或者更高)。那个"真实的"未被代理的dataSource对你来说,依然可用,只不过其bean名称是dataSourceUnproxied。你可用想其他Spring bean那样来访问此bean,比如使用依赖注入:class MyService { def dataSourceUnproxied
…
}ApplicationContext中获取:def dataSourceUnproxied = ctx.dataSourceUnproxied
3.3.5 数据库管理界面
The H2 database console is a convenient feature of H2 that provides a web-based interface to any database that you have a JDBC driver for, and it's very useful to view the database you're developing against. It's especially useful when running against an in-memory database.You can access the console by navigating to http://localhost:8080/appname/dbconsole in a browser. The URI can be configured using the
H2数据库管理界面是在H2特性的基础上提供的一个基于WEB界面的数据库管理,用以管理任何基于JDBC的数据库,在开发阶段用来查看数据库非常有用,尤其在你的应用运行于数据库的内存模式时。你可以在浏览器中通过 http://localhost:8080/appname/dbconsole 来使用访问。此URI可以通过配置Config.groovy中的grails.dbconsole.urlRoot attribute in Config.groovy and defaults to '/dbconsole'.The console is enabled by default in development mode and can be disabled or enabled in other environments by using the grails.dbconsole.enabled attribute in Config.groovy. For example you could enable the console in production usingenvironments {
production {
grails.serverURL = "http://www.changeme.com"
grails.dbconsole.enabled = true
grails.dbconsole.urlRoot = '/admin/dbconsole'
}
development {
grails.serverURL = "http://localhost:8080/${appName}"
}
test {
grails.serverURL = "http://localhost:8080/${appName}"
}
}If you enable the console in production be sure to guard access to it using a trusted security framework.
grails.dbconsole.urlRoot属性来改变,缺省是'/dbconsole'。此界面在开发模式下缺省是有效的,你也可以通过修改Config.groovy中的grails.dbconsole.enabled属性来使其在其他环境模式下失效或者生效。比如,你可以在生产环境中使其生效:environments {
production {
grails.serverURL = "http://www.changeme.com"
grails.dbconsole.enabled = true
grails.dbconsole.urlRoot = '/admin/dbconsole'
}
development {
grails.serverURL = "http://localhost:8080/${appName}"
}
test {
grails.serverURL = "http://localhost:8080/${appName}"
}
}如果你要在生产环境中使用此功能,请确保使用安全可信的框架来保护。
Configuration
By default the console is configured for an H2 database which will work with the default settings if you haven't configured an external database - you just need to change the JDBC URL tojdbc:h2:mem:devDB. If you've configured an external database (e.g. MySQL, Oracle, etc.) then you can use the Saved Settings dropdown to choose a settings template and fill in the url and username/password information from your DataSource.groovy.
配置
缺省情况下,如果你没有使用外部数据库,那么数据库管理界面是使用H2数据库的,其JDBC的URL配置成jdbc:h2:mem:devDB即可。但是如果你使用的是一个外部数据库(比如MySQL、 Oracle等),那你需要从下拉框中选择合适的JDBC配置模板,并且配置合适的url、用户名/密码,要确保跟DataSource.groovy的配置是一致的。
3.3.6 多数据源
By default all domain classes share a single
缺省情况下,所有的领域类共享同一个DataSource and a single database, but you have the option to partition your domain classes into two or more DataSources.
DataSource和数据库,但是你还是有将领域类拆分到两个甚至更多个DataSource的选择的。Configuring Additional DataSources
The defaultDataSource configuration in grails-app/conf/DataSource.groovy looks something like this:dataSource {
pooled = true
driverClassName = "org.h2.Driver"
username = "sa"
password = ""
}
hibernate {
cache.use_second_level_cache = true
cache.use_query_cache = true
cache.provider_class = 'net.sf.ehcache.hibernate.EhCacheProvider'
}environments {
development {
dataSource {
dbCreate = "create-drop"
url = "jdbc:h2:mem:devDb"
}
}
test {
dataSource {
dbCreate = "update"
url = "jdbc:h2:mem:testDb"
}
}
production {
dataSource {
dbCreate = "update"
url = "jdbc:h2:prodDb"
}
}
}DataSource with the Spring bean named dataSource. To configure extra DataSources, add another dataSource block (at the top level, in an environment block, or both, just like the standard DataSource definition) with a custom name, separated by an underscore. For example, this configuration adds a second DataSource, using MySQL in the development environment and Oracle in production:environments {
development {
dataSource {
dbCreate = "create-drop"
url = "jdbc:h2:mem:devDb"
}
dataSource_lookup {
dialect = org.hibernate.dialect.MySQLInnoDBDialect
driverClassName = 'com.mysql.jdbc.Driver'
username = 'lookup'
password = 'secret'
url = 'jdbc:mysql://localhost/lookup'
dbCreate = 'update'
}
}
test {
dataSource {
dbCreate = "update"
url = "jdbc:h2:mem:testDb"
}
}
production {
dataSource {
dbCreate = "update"
url = "jdbc:h2:prodDb"
}
dataSource_lookup {
dialect = org.hibernate.dialect.Oracle10gDialect
driverClassName = 'oracle.jdbc.driver.OracleDriver'
username = 'lookup'
password = 'secret'
url = 'jdbc:oracle:thin:@localhost:1521:lookup'
dbCreate = 'update'
}
}
}配置额外的数据源
缺省的DataSource配置是位于grails-app/conf/DataSource.groovy中的,大体样子如下:dataSource {
pooled = true
driverClassName = "org.h2.Driver"
username = "sa"
password = ""
}
hibernate {
cache.use_second_level_cache = true
cache.use_query_cache = true
cache.provider_class = 'net.sf.ehcache.hibernate.EhCacheProvider'
}environments {
development {
dataSource {
dbCreate = "create-drop"
url = "jdbc:h2:mem:devDb"
}
}
test {
dataSource {
dbCreate = "update"
url = "jdbc:h2:mem:testDb"
}
}
production {
dataSource {
dbCreate = "update"
url = "jdbc:h2:prodDb"
}
}
}dataSource的DataSource。要配置额外的DataSource,需要增加另外一个自定义名称(以下划线分割)的dataSource(跟标准的DataSource类似,只不过要定义在在最外层、环境代码块或者同时两个地方)代码块即可。例如,以下代码的配置新增了第二个DataSource,其在开发环境下是MySQL数据库,在生产环境下是Oracle:environments {
development {
dataSource {
dbCreate = "create-drop"
url = "jdbc:h2:mem:devDb"
}
dataSource_lookup {
dialect = org.hibernate.dialect.MySQLInnoDBDialect
driverClassName = 'com.mysql.jdbc.Driver'
username = 'lookup'
password = 'secret'
url = 'jdbc:mysql://localhost/lookup'
dbCreate = 'update'
}
}
test {
dataSource {
dbCreate = "update"
url = "jdbc:h2:mem:testDb"
}
}
production {
dataSource {
dbCreate = "update"
url = "jdbc:h2:prodDb"
}
dataSource_lookup {
dialect = org.hibernate.dialect.Oracle10gDialect
driverClassName = 'oracle.jdbc.driver.OracleDriver'
username = 'lookup'
password = 'secret'
url = 'jdbc:oracle:thin:@localhost:1521:lookup'
dbCreate = 'update'
}
}
}Configuring Domain Classes
If a domain class has noDataSource configuration, it defaults to the standard 'dataSource'. Set the datasource property in the mapping block to configure a non-default DataSource. For example, if you want to use the ZipCode domain to use the 'lookup' DataSource, configure it like this;class ZipCode { String code static mapping = {
datasource 'lookup'
}
}DataSources. Use the datasources property with a list of names to configure more than one, for example:class ZipCode { String code static mapping = {
datasources(['lookup', 'auditing'])
}
}DataSource and one or more others, use the special name 'DEFAULT' to indicate the default DataSource:class ZipCode { String code static mapping = {
datasources(['lookup', 'DEFAULT'])
}
}DataSources use the special value 'ALL':class ZipCode { String code static mapping = {
datasource 'ALL'
}
}配置领域类
如果一个领域类没有配置DataSource,那么其缺省使用标准的'dataSource'。你可以在mapping代码块中设置datasource属性来配置一个非标准的DataSource。例如,你希望ZipCode使用名为'lookup'的DataSource,其配置如下:class ZipCode { String code static mapping = {
datasource 'lookup'
}
}DataSources。这时候,只需要将datasources设置为一个名称的列表即可,比如:class ZipCode { String code static mapping = {
datasources(['lookup', 'auditing'])
}
}DataSource,可以使用名称为'DEFAULT'来代表缺省的DataSource:class ZipCode { String code static mapping = {
datasources(['lookup', 'DEFAULT'])
}
}DataSource,请使用特定名称'ALL':class ZipCode { String code static mapping = {
datasource 'ALL'
}
}Namespaces and GORM Methods
If a domain class uses more than oneDataSource then you can use the namespace implied by each DataSource name to make GORM calls for a particular DataSource. For example, consider this class which uses two DataSources:class ZipCode { String code static mapping = {
datasources(['lookup', 'auditing'])
}
}DataSource specified is the default when not using an explicit namespace, so in this case we default to 'lookup'. But you can call GORM methods on the 'auditing' DataSource with the DataSource name, for example:def zipCode = ZipCode.auditing.get(42) … zipCode.auditing.save()
DataSource to the method call in both the static case and the instance case.
命名空间和GORM方法
如果一个领域类使用了多于一个的DataSource,你可以将其每个DataSource名称作为命名空间,并且以此命名来执行GORM的方法调用。例如,下面示例的类有两个DataSource:class ZipCode { String code static mapping = {
datasources(['lookup', 'auditing'])
}
}DataSource被视为缺省,上例中其缺省命名空间是'lookup'。但是你也可以在'auditing'的DataSource上执行GORM方法,比如:def zipCode = ZipCode.auditing.get(42) … zipCode.auditing.save()
DataSource上进行静态和实例类型的方法调用。Services
Like Domain classes, by default Services use the defaultDataSource and PlatformTransactionManager. To configure a Service to use a different DataSource, use the static datasource property, for example:class DataService { static datasource = 'lookup' void someMethod(...) {
…
}
}DataSource, so be sure to only make changes for domain classes whose DataSource is the same as the Service.Note that the datasource specified in a service has no bearing on which datasources are used for domain classes; that's determined by their declared datasources in the domain classes themselves. It's used to declare which transaction manager to use.What you'll see is that if you have a Foo domain class in dataSource1 and a Bar domain class in dataSource2, and WahooService uses dataSource1, a service method that saves a new Foo and a new Bar will only be transactional for Foo since they share the datasource. The transaction won't affect the Bar instance. If you want both to be transactional you'd need to use two services and XA datasources for two-phase commit, e.g. with the Atomikos plugin.
服务类
跟领域类相似,服务类也是使用缺省的DataSource和PlatformTransactionManager。要配置服务使用另外一个不同的DataSource,请使用静态的(static)datasource属性,比如:class DataService { static datasource = 'lookup' void someMethod(...) {
…
}
}DataSource,因此请确保领域类的DataSource的名字要跟服务类中定义的一致。注意,一个服务类的datasource不对领域类的datasources产生影响,后者由其自身的声明决定。服务类的datasource多用来声明要使用哪一个事务管理器。假设你有两个数据源,领域类Foo属于dataSource1,Bar属于dataSource2,而WahooService使用dataSource1,此外还有一个方法来实现Foo和Bar的新增保存,那么只有Foo是支持事务的,因为他们共享dataSource1数据源。而Bar实例并不受事务影响。如果你想两者都支持事务,那么你需要两个服务类和支持两阶段提交的XA数据源,比如使用Atomikos插件。XA and Two-phase Commit
Grails has no native support for XADataSources or two-phase commit, but the Atomikos plugin makes it easy. See the plugin documentation for the simple changes needed in your DataSource definitions to reconfigure them as XA DataSources.
XA和两阶段(Two-phase)提交
Grails并没有直接支持XADataSources 或者 两阶段提交,但是Atomikos 插件使两者变得容易。此插件的文档有介绍如何比较容易的将现有的DataSource定义重新配置为XA DataSources。
3.4 外部配置
Some deployments require that configuration be sourced from more than one place and be changeable without requiring a rebuild of the application. In order to support deployment scenarios such as these the configuration can be externalized. To do so, point Grails at the locations of the configuration files that should be used by adding a In the above example we're loading configuration files (both Java Properties files and ConfigSlurper configurations) from different places on the classpath and files located in This can be useful in situations where the config is either coming from a plugin or some other part of your application. A typical use for this is re-using configuration provided by plugins across multiple applications.Ultimately all configuration files get merged into the
某些部署要求配置信息可以放在多个源文件中,并且在不需要重现编译打包的情况下可被修改。为了能够支撑这些特定的部署场景,Grails的配置信息可以在外部进行配置。要完成此功能,只需要设置grails.config.locations setting in Config.groovy, for example:grails.config.locations = [
"classpath:${appName}-config.properties",
"classpath:${appName}-config.groovy",
"file:${userHome}/.grails/${appName}-config.properties",
"file:${userHome}/.grails/${appName}-config.groovy" ]USER_HOME.It is also possible to load config by specifying a class that is a config script.grails.config.locations = [com.my.app.MyConfig]
config property of the GrailsApplication object and are hence obtainable from there.Values that have the same name as previously defined values will overwrite the existing values, and the pointed to configuration sources are loaded in the order in which they are defined.
Config.groovy中的grails.config.locations的值来指向配置文件的位置即可,比如:grails.config.locations = [
"classpath:${appName}-config.properties",
"classpath:${appName}-config.groovy",
"file:${userHome}/.grails/${appName}-config.properties",
"file:${userHome}/.grails/${appName}-config.groovy" ]USER_HOME下加载不同的配置文件(包括Java属性文件和Groovy的ConfigSlurper也可以通过配置脚本的类名来加载,比如:grails.config.locations = [com.my.app.MyConfig]
config属性中,因此,要获取使用也是通过它来实现的。配置中如果一个名字有多个值,那么新值将覆盖旧的,其顺序是根据源文件的加载顺序来定义的。Config Defaults
The configuration values contained in the locations described by thegrails.config.locations property will override any values defined in your application Config.groovy file which may not be what you want. You may want to have a set of default values be be loaded that can be overridden in either your application's Config.groovy file or in a named config location. For this you can use the grails.config.defaults.locations property.This property supports the same values as the grails.config.locations property (i.e. paths to config scripts, property files or classes), but the config described by grails.config.defaults.locations will be loaded before all other values and can therefore be overridden. Some plugins use this mechanism to supply one or more sets of default configuration that you can choose to include in your application config.Grails also supports the concept of property place holders and property override configurers as defined in Spring For more information on these see the section on Grails and Spring
缺省配置
通过grails.config.locations定义的配置将 优先于 你在Config.groovy文件中的任意值,这也许并非你所需要的。你希望Config.groovy或者特定位置的文件才能加载并且重载特定的 缺省值 ,这种情况,你可以通过配置grails.config.defaults.locations属性来实现。此属性的值跟grails.config.locations一样(可以是特定路径下的配置脚本、属性文件或者类名),但与之不同的是通过grails.config.defaults.locations来配置的值比其他方式加载的 更早 ,因此也就可有被重载。有些插件就是通过此机制来实现一个或者多个缺省配置的。Grails还支撑Spring 配置中属性占位符和覆盖的概念。更多信息请参考Grails和Spring章节
3.5 版本
Versioning Basics
Grails has built in support for application versioning. The version of the application is set to0.1 when you first create an application with the create-app command. The version is stored in the application meta data file application.properties in the root of the project.To change the version of your application you can edit the file manually, or run the set-version command:grails set-version 0.2
版本基础
Grails内置了对应用版本的支持。当你第一次通过create-app来创建应用的时候,其版本设置为0.1。版本信息被存储在工程根目录下的application.properties文件种。要改变应用的版本,你可以手工修改此文件,或者运行set-version命令,比如:grails set-version 0.2
Detecting Versions at Runtime
You can detect the application version using Grails' support for application metadata using the GrailsApplication class. For example within controllers there is an implicit grailsApplication variable that can be used:def version = grailsApplication.metadata['app.version']
def grailsVersion = grailsApplication.metadata['app.grails.version']
GrailsUtil class:import grails.util.GrailsUtil
…
def grailsVersion = GrailsUtil.grailsVersion运行期间检测版本
你可以使用GrailsApplication类来检测应用的版本信息,比如在控制器中,就有一个隐含的grailsApplication变量可用:def version = grailsApplication.metadata['app.version']
def grailsVersion = grailsApplication.metadata['app.grails.version']
GrailsUtil类来获取Grails的版本:import grails.util.GrailsUtil
…
def grailsVersion = GrailsUtil.grailsVersion3.6 文档引擎
Since Grails 1.2, the documentation engine that powers the creation of this documentation has been available for your own Grails projects.The documentation engine uses a variation on the Textile syntax to automatically create project documentation with smart linking, formatting etc.
从Grails 1.2以来,本文的文档就是通过文档引擎来创建的,并且对你的Grails项目文档也是有效的。文档引擎在Textile语法基础上,进行了一些改动,以适应自动创建工程文档的需要,此文档支持灵活链接、格式化等功能。Creating project documentation
To use the engine you need to follow a few conventions. First, you need to create asrc/docs/guide directory where your documentation source files will go. Then, you need to create the source docs themselves. Each chapter should have its own gdoc file as should all numbered sub-sections. You will end up with something like:+ src/docs/guide/introduction.gdoc + src/docs/guide/introduction/changes.gdoc + src/docs/guide/gettingStarted.gdoc + src/docs/guide/configuration.gdoc + src/docs/guide/configuration/build.gdoc + src/docs/guide/configuration/build/controllers.gdoc
src/docs/guide/toc.yml file that contains the structure and titles for each section. This file is in YAML format and basically represents the structure of the user guide in tree form. For example, the above files could be represented as:introduction:
title: Introduction
changes: Change Log
gettingStarted: Getting Started
configuration:
title: Configuration
build:
title: Build Config
controllers: Specifying Controllerstitle: plus the title of the section as seen by the end user. Every sub-section then has its own line after the title. Leaf nodes, i.e. those without any sub-sections, declare their title on the same line as the section name but after the colon.That's it. You can easily add, remove, and move sections within the toc.yml to restructure the generated user guide. You should also make sure that all section names, i.e. the gdoc filenames, should be unique since they are used for creating internal links and for the HTML filenames. Don't worry though, the documentation engine will warn you of duplicate section names.
创建工程文档
为了使用此引擎,你需要遵循一些约定。首先,你需要创建src/docs/guide目录用来存放文档的源文件。其次,需要创建文档文件,每一章节应该是独立的一个gdoc文件,并且还应该按照子章节的序号排列。比如下面示例:+ src/docs/guide/introduction.gdoc + src/docs/guide/introduction/changes.gdoc + src/docs/guide/gettingStarted.gdoc + src/docs/guide/configuration.gdoc + src/docs/guide/configuration/build.gdoc + src/docs/guide/configuration/build/controllers.gdoc
src/docs/guide/toc.yml文件,用以描述章节的结构和标题。 此YAML格式的文件用以表述手册的树形格式的结构。比如上述的文件可以用如下的描述:introduction:
title: Introduction
changes: Change Log
gettingStarted: Getting Started
configuration:
title: Configuration
build:
title: Build Config
controllers: Specifying Controllerstitle:加对此章节的标题描述,在标题后边是每一个子章节的信息。如果子章节是一个叶子节点(不包含子章节的章节)其标题跟章节名称在同一行就好了,但要以冒号分割(可以参考上述示例--译者注)。搞定!你可以轻松地添加、删除和移动toc.yml中的章节,这样就可以重新排版用户手册了。此外你也需要确认所有的章节名称(gdoc文件名称)是全局唯一的,因为那些内部超链接和HTML名称也要用到它们。不过也无需太担心,文档引擎将提示你那些重复的章节名称。Creating reference items
Reference items appear in the Quick Reference section of the documentation. Each reference item belongs to a category and a category is a directory located in thesrc/docs/ref directory. For example, suppose you have defined a new controller method called renderPDF. That belongs to the Controllers category so you would create a gdoc text file at the following location:+ src/docs/ref/Controllers/renderPDF.gdoc
创建条目(Item)引用
条目引用出现在文档的快速引用章节。每一个引用都属于一个类别,此类别位于src/docs/ref中。举例来说,假设你定义了一个新的控制器方法renderPDF,此方法属于Controllers类别,那么你应该在如下所示的位置创建一个gdoc文本文件:+ src/docs/ref/Controllers/renderPDF.gdoc
Configuring Output Properties
There are various properties you can set within yourgrails-app/conf/Config.groovy file that customize the output of the documentation such as:
- grails.doc.title - The title of the documentation
- grails.doc.subtitle - The subtitle of the documentation
- grails.doc.authors - The authors of the documentation
- grails.doc.license - The license of the software
- grails.doc.copyright - The copyright message to display
- grails.doc.footer - The footer to use
配置输出属性
在grails-app/conf/Config.groovy文件中,你有很多不同的属性可以设置,用以自定义文档的输出,比如:
- grails.doc.title - 文档的标题
- grails.doc.subtitle - 文档的子标题
- grails.doc.authors - 文档的作者
- grails.doc.license - 软件的许可证
- grails.doc.copyright - 要显示的版权信息
- grails.doc.footer - 脚注
Generating Documentation
Once you have created some documentation (refer to the syntax guide in the next chapter) you can generate an HTML version of the documentation using the command:grails doc
docs/manual/index.html which can be opened in a browser to view your documentation.
生成文档
一旦你创建了文档(语法请参考下一节),你就可以生成HTML版本的文档了,命令如下:grails doc
docs/manual/index.html,这样你就可以在浏览器中查看文档了。Documentation Syntax
As mentioned the syntax is largely similar to Textile or Confluence style wiki markup. The following sections walk you through the syntax basics.文档语法
正如以前所述,文档语法跟Textile或者Confluence风格的wiki标签。下述章节将对基本的语法做个简单地介绍。Basic Formatting
Monospace:monospace
@monospace@
_italic_
*bold*

!http://grails.org/images/new/grailslogo_topNav.png!
基本格式
等宽字体:monospace
@monospace@
_italic_
*bold*
!http://grails.org/images/new/grailslogo_topNav.png!
Linking
There are several ways to create links with the documentation generator. A basic external link can either be defined using confluence or textile style markup:[SpringSource|http://www.springsource.com/]
"SpringSource":http://www.springsource.com/guide: prefix with the name of the section you want to link to:[Intro|guide:introduction]
[controllers|renderPDF]
api: prefix. For example:[String|api:java.lang.String]
grails-app/conf/Config.groovy. For example:grails.doc.api.org.hibernate=
"http://docs.jboss.org/hibernate/stable/core/javadocs"org.hibernate package to link to the Hibernate website's API docs.
超链接
文档生成链接的方式有几种,基本的外部链接(指向本文档之外的超链接--译者注)可以使用confluence或者textile风格的标签:[SpringSource|http://www.springsource.com/]
"SpringSource":http://www.springsource.com/guide:前缀和你要指向的章节名称:[Intro|guide:introduction]
[controllers|renderPDF]
api:前缀。比如:[String|api:java.lang.String]
grails-app/conf/Config.groovy来进行配置,比如:grails.doc.api.org.hibernate=
"http://docs.jboss.org/hibernate/stable/core/javadocs"org.hibernate包指向Hibernate的官方API文档。Lists and Headings
Headings can be created by specifying the letter 'h' followed by a number and then a dot:h3.<space>Heading3 h4.<space>Heading4
* item 1
** subitem 1
** subitem 2
* item 2
# item 1
table macro:| Name | Number |
|---|---|
| Albert | 46 |
| Wilma | 1348 |
| James | 12 |
{table}
 *Name* | *Number*
 Albert | 46
 Wilma | 1348
 James | 12
{table}
列表和标头
标头可以通过字母'h'加数字再加一个点来表示,比如:h3.<space>Heading3 h4.<space>Heading4
* item 1
** subitem 1
** subitem 2
* item 2
# item 1
table来实现:| Name | Number |
|---|---|
| Albert | 46 |
| Wilma | 1348 |
| James | 12 |
{table}
 *Name* | *Number*
 Albert | 46
 Wilma | 1348
 James | 12
{table}
Code and Notes
You can define code blocks with thecode macro:class Book {
String title
}{code}
class Book {
    String title
}
{code}<hello>world</hello>
{code:xml}
<hello>world</hello>
{code}This is a note!
{note}
This is a note!
{note}This is a warning!
{warning}
This is a warning!
{warning}
代码和提示
你可以通过宏code来定义代码块,比如:class Book {
String title
}{code}
class Book {
    String title
}
{code}<hello>world</hello>
{code:xml}
<hello>world</hello>
{code}This is a note!
{note}
This is a note!
{note}This is a warning!
{warning}
This is a warning!
{warning}
3.7 依赖解析
Grails features a dependency resolution DSL that lets you control how plugins and JAR dependencies are resolved.You specify a The default configuration looks like the following:The details of the above will be explained in the next few sections.
Grails提供了依赖解析的DSL来处理插件和JAR的依赖处理。你可以在grails.project.dependency.resolution property inside the grails-app/conf/BuildConfig.groovy file that configures how dependencies are resolved:grails.project.dependency.resolution = {
// config here
}grails.project.class.dir = "target/classes" grails.project.test.class.dir = "target/test-classes" grails.project.test.reports.dir = "target/test-reports" //grails.project.war.file = "target/${appName}-${appVersion}.war"grails.project.dependency.resolution = { // inherit Grails' default dependencies inherits("global") { // uncomment to disable ehcache // excludes 'ehcache' } log "warn" repositories { grailsPlugins() grailsHome() grailsCentral() // uncomment these to enable remote dependency resolution // from public Maven repositories //mavenCentral() //mavenLocal() //mavenRepo "http://snapshots.repository.codehaus.org" //mavenRepo "http://repository.codehaus.org" //mavenRepo "http://download.java.net/maven/2/" //mavenRepo "http://repository.jboss.com/maven2/" } dependencies { // specify dependencies here under either 'build', 'compile', // 'runtime', 'test' or 'provided' scopes eg. // runtime 'mysql:mysql-connector-java:5.1.16' } plugins { compile ":hibernate:$grailsVersion" compile ":jquery:1.6.1.1" compile ":resources:1.0" build ":tomcat:$grailsVersion" } }
grails-app/conf/BuildConfig.groovy中设置grails.project.dependency.resolution属性来配置依赖是如何解析的,模板如下:grails.project.dependency.resolution = {
// config here
}grails.project.class.dir = "target/classes" grails.project.test.class.dir = "target/test-classes" grails.project.test.reports.dir = "target/test-reports" //grails.project.war.file = "target/${appName}-${appVersion}.war"grails.project.dependency.resolution = { // inherit Grails' default dependencies inherits("global") { // uncomment to disable ehcache // excludes 'ehcache' } log "warn" repositories { grailsPlugins() grailsHome() grailsCentral() // uncomment these to enable remote dependency resolution // from public Maven repositories //mavenCentral() //mavenLocal() //mavenRepo "http://snapshots.repository.codehaus.org" //mavenRepo "http://repository.codehaus.org" //mavenRepo "http://download.java.net/maven/2/" //mavenRepo "http://repository.jboss.com/maven2/" } dependencies { // specify dependencies here under either 'build', 'compile', // 'runtime', 'test' or 'provided' scopes eg. // runtime 'mysql:mysql-connector-java:5.1.16' } plugins { compile ":hibernate:$grailsVersion" compile ":jquery:1.6.1.1" compile ":resources:1.0" build ":tomcat:$grailsVersion" } }
3.7.1 配置和依赖
Grails features five dependency resolution configurations (or 'scopes'):
This uses the string syntax: In Maven terminology,
Grails提供了如下5种依赖解析配置(或者是‘范围’):
-
build: Dependencies for the build system only -
compile: Dependencies for the compile step -
runtime: Dependencies needed at runtime but not for compilation (see above) -
test: Dependencies needed for testing but not at runtime (see above) -
provided: Dependencies needed at development time, but not during WAR deployment
dependencies block you can specify a dependency that falls into one of these configurations by calling the equivalent method. For example if your application requires the MySQL driver to function at runtime you can specify that like this:runtime 'com.mysql:mysql-connector-java:5.1.16'
group:name:version. You can also use a Map-based syntax:runtime group: 'com.mysql',
name: 'mysql-connector-java',
version: '5.1.16'group corresponds to an artifact's groupId and name corresponds to its artifactId.Multiple dependencies can be specified by passing multiple arguments:runtime 'com.mysql:mysql-connector-java:5.1.16',
'net.sf.ehcache:ehcache:1.6.1'// Orruntime(
[group:'com.mysql', name:'mysql-connector-java', version:'5.1.16'],
[group:'net.sf.ehcache', name:'ehcache', version:'1.6.1']
)-
build: 只在系统构建时的依赖 -
compile: 编译阶段时的依赖 -
runtime: 运行阶段的依赖,不包括编译阶段(见上解释) -
test: 测试阶段的依赖,不包括运行阶段 -
provided: 开发阶段的依赖,不包括WAR部署阶段
dependencies代码块中,你可以通过同等的方法调用方式来指定一个依赖。比如你的应用中需要runtime的MySQL驱动,你可以这样处理:runtime 'com.mysql:mysql-connector-java:5.1.16'
group:name:version,你也可以使用Map格式的语法:runtime group: 'com.mysql',
name: 'mysql-connector-java',
version: '5.1.16'group跟工件(artifact)的groupId相对应,name跟artifactId相对应。多个依赖可以通过多参数方式来处理:runtime 'com.mysql:mysql-connector-java:5.1.16',
'net.sf.ehcache:ehcache:1.6.1'// Orruntime(
[group:'com.mysql', name:'mysql-connector-java', version:'5.1.16'],
[group:'net.sf.ehcache', name:'ehcache', version:'1.6.1']
)Disabling transitive dependency resolution
By default, Grails will not only get the JARs and plugins that you declare, but it will also get their transitive dependencies. This is usually what you want, but there are occasions where you want a dependency without all its baggage. In such cases, you can disable transitive dependency resolution on a case-by-case basis:runtime('com.mysql:mysql-connector-java:5.1.16',
'net.sf.ehcache:ehcache:1.6.1') {
transitive = false
}// Or
runtime group:'com.mysql',
name:'mysql-connector-java',
version:'5.1.16',
transitive:false禁用依赖解析的传递性
缺省情况下,Grails不仅仅获取你直接声明的JAR和插件,还包含其间接所依赖的。多数情况下,这正是你所需要的,不过在个别情况下,你并不需要这种传递性的依赖。这时,你可以有针对地禁止传递依赖,比如:runtime('com.mysql:mysql-connector-java:5.1.16',
'net.sf.ehcache:ehcache:1.6.1') {
transitive = false
}// Or
runtime group:'com.mysql',
name:'mysql-connector-java',
version:'5.1.16',
transitive:falseExcluding specific transitive dependencies
A far more common scenario is where you want the transitive dependencies, but some of them cause issues with your own dependencies or are unnecessary. For example, many Apache projects have 'commons-logging' as a transitive dependency, but it shouldn't be included in a Grails project (we use SLF4J). That's where theexcludes option comes in:runtime('com.mysql:mysql-connector-java:5.1.16',
'net.sf.ehcache:ehcache:1.6.1') {
excludes "xml-apis", "commons-logging"
}// Or
runtime(group:'com.mysql', name:'mysql-connector-java', version:'5.1.16') {
excludes([ group: 'xml-apis', name: 'xml-apis'],
[ group: 'org.apache.httpcomponents' ],
[ name: 'commons-logging' ])exclude as well, but that can only accept a single string or Map:runtime('com.mysql:mysql-connector-java:5.1.16',
'net.sf.ehcache:ehcache:1.6.1') {
exclude "xml-apis"
}排除特定的依赖
传递依赖对你来说是如此的常用,但也有会跟你自己的依赖冲突或者重复的情况,比如很多的Apache项目都有依赖于'commons-logging',但是它不能被包含于Grails工程(其使用的是SLF4J)。因此就产生了excludes选项,比如:runtime('com.mysql:mysql-connector-java:5.1.16',
'net.sf.ehcache:ehcache:1.6.1') {
excludes "xml-apis", "commons-logging"
}// Or
runtime(group:'com.mysql', name:'mysql-connector-java', version:'5.1.16') {
excludes([ group: 'xml-apis', name: 'xml-apis'],
[ group: 'org.apache.httpcomponents' ],
[ name: 'commons-logging' ])exclude来排除,不过此处只能接收一个字符串或者Map:runtime('com.mysql:mysql-connector-java:5.1.16',
'net.sf.ehcache:ehcache:1.6.1') {
exclude "xml-apis"
}Using Ivy module configurations
If you use Ivy module configurations and wish to depend on a specific configuration of a module, you can use thedependencyConfiguration method to specify the configuration to use.provided("my.org:web-service:1.0") { dependencyConfiguration "api" }
"default" will be used (which is also the correct value for dependencies coming from Maven style repositories).
使用Ivy模块配置
如果你是使用Ivy的模块配置,并且希望依赖于某一特定模块,你可以使用dependencyConfiguration方法来指定:provided("my.org:web-service:1.0") { dependencyConfiguration "api" }
"default"缺省配置(其也可以兼容来自Maven风格的存储仓库)。Where are the JARs?
With all these declarative dependencies, you may wonder where all the JARs end up. They have to go somewhere after all. By default Grails puts them into a directory, called the dependency cache, that resides on your local file system atuser.home/.grails/ivy-cache. You can change this either via the settings.groovy file:grails.dependency.cache.dir = "${userHome}/.my-dependency-cache"grails.project.dependency.resolution = {
…
cacheDir "target/ivy-cache"
…
}settings.groovy option applies to all projects, so it's the preferred approach.
JAR在哪里?
对于所有声明的依赖,你可能好奇,这些JAR都到哪里去了?它们总要有个地方来保存的。缺省情况下,Grails将它们放到依赖缓存的目录,其位于你本地文件系统中user.home/.grails/ivy-cache。你也可以通过settings.groovy来修改,比如:grails.dependency.cache.dir = "${userHome}/.my-dependency-cache"grails.project.dependency.resolution = {
…
cacheDir "target/ivy-cache"
…
}settings.groovy的选项将应用于所有的工程,因为它是最优先使用的。
3.7.2 依赖存储库
Remote Repositories
Initially your BuildConfig.groovy does not use any remote public Maven repositories. There is a defaultgrailsHome() repository that will locate the JAR files Grails needs from your Grails installation. To use a public repository, specify it in the repositories block:repositories {
mavenCentral()
}ebr() method:repositories {
ebr()
}repositories {
mavenRepo "http://repository.codehaus.org"
}repositories {
mavenRepo name: "Codehaus", root: "http://repository.codehaus.org"
}远程存储仓库
刚创建的BuildConfig.groovy文件并没有使用任何远程的公共Maven存储库,在那里只有一个缺省的grailsHome()用以从Grails安装目录定位所需要的JAR文件。要使用远程的公共存储库,请使用 repositories代码块,比如:repositories {
mavenCentral()
}ebr()方法:repositories {
ebr()
}repositories {
mavenRepo "http://repository.codehaus.org"
}repositories {
mavenRepo name: "Codehaus", root: "http://repository.codehaus.org"
}Controlling Repositories Inherited from Plugins
A plugin you have installed may define a reference to a remote repository just as an application can. By default your application will inherit this repository definition when you install the plugin.If you do not wish to inherit repository definitions from plugins then you can disable repository inheritance:repositories {
inherit false
}控制插件存储库地继承
通常,你安装的插件会定义一个远程的存储库,缺省情况下,而你的应用将继承你安装插件中的存储库的定义。如果你不希望继承来自插件的存储库定义,你可以禁止这种存储库的继承:repositories {
inherit false
}Offline Mode
There are times when it is not desirable to connect to any remote repositories (whilst working on the train for example!). In this case you can use theoffline flag to execute Grails commands and Grails will not connect to any remote repositories:grails --offline run-app
Note that this command will fail if you do not have the necessary dependencies in your local Ivy cacheYou can also globally configure offline mode by setting
grails.offline.mode to true in ~/.grails/settings.groovy or in your project's BuildConfig.groovy file:grails.offline.mode=true离线模式
偶尔的时候,你将不能访问任何远程的存储库(比如在火车上工作时)。此种情况下,你可以使用offline标志来执行Grails命令,这样Grails将不会连接任何远程存储库,比如:grails --offline run-app
注意:如果你本地Ivy缓存中没有所需的依赖,上述命令将会出错。你还可以通过设置
~/.grails/settings.groovy或者工程中BuildConfig.groovy文件中的grails.offline.mode为true的方式,将其配置为全局离线模式:grails.offline.mode=trueLocal Resolvers
If you do not wish to use a public Maven repository you can specify a flat file repository:repositories {
flatDir name:'myRepo', dirs:'/path/to/repo'
}~/.m2/repository) as a repository:repositories {
mavenLocal()
}本地解析器
如果你不希望使用远程的Maven存储库,你可以指定一个平面文件(flat file)存储器:repositories {
flatDir name:'myRepo', dirs:'/path/to/repo'
}~/.m2/repository)作为存储器,可以用下面的处理:repositories {
mavenLocal()
}Custom Resolvers
If all else fails since Grails builds on Apache Ivy you can specify an Ivy resolver:/* * Configure our resolver. */ def libResolver = new org.apache.ivy.plugins.resolver.URLResolver() ['libraries', 'builds'].each { libResolver.addArtifactPattern( "http://my.repository/${it}/" + "[organisation]/[module]/[revision]/[type]s/[artifact].[ext]") libResolver.addIvyPattern( "http://my.repository/${it}/" + "[organisation]/[module]/[revision]/[type]s/[artifact].[ext]") }libResolver.name = "my-repository" libResolver.settings = ivySettingsresolver libResolver
import org.apache.ivy.plugins.resolver.SshResolver
…
repositories {
    ...    def sshResolver = new SshResolver(
            name: "myRepo",
            user: "username",
            host: "dev.x.com",
            keyFile: new File("/home/username/.ssh/id_rsa"),
            m2compatible: true)    sshResolver.addArtifactPattern(
            "/home/grails/repo/[organisation]/[artifact]/" +
            "[revision]/[artifact]-[revision].[ext]")    sshResolver.latestStrategy =
            new org.apache.ivy.plugins.latest.LatestTimeStrategy()    sshResolver.changingPattern = ".*SNAPSHOT"    sshResolver.setCheckmodified(true)    resolver sshResolver
}
grails -classpath /path/to/jsch compile|run-app|etc.
CLASSPATH environment variable but be aware this it affects many Java applications. An alternative on Unix is to create an alias for grails -classpath ... so that you don't have to type the extra arguments each time.
自定义解析器
如果上述的都失败了,你还可以自定义一个Ivy解析器,因为Grails是基于Apache Ivy构建的:/* * Configure our resolver. */ def libResolver = new org.apache.ivy.plugins.resolver.URLResolver() ['libraries', 'builds'].each { libResolver.addArtifactPattern( "http://my.repository/${it}/" + "[organisation]/[module]/[revision]/[type]s/[artifact].[ext]") libResolver.addIvyPattern( "http://my.repository/${it}/" + "[organisation]/[module]/[revision]/[type]s/[artifact].[ext]") }libResolver.name = "my-repository" libResolver.settings = ivySettingsresolver libResolver
import org.apache.ivy.plugins.resolver.SshResolver
…
repositories {
    ...    def sshResolver = new SshResolver(
            name: "myRepo",
            user: "username",
            host: "dev.x.com",
            keyFile: new File("/home/username/.ssh/id_rsa"),
            m2compatible: true)    sshResolver.addArtifactPattern(
            "/home/grails/repo/[organisation]/[artifact]/" +
            "[revision]/[artifact]-[revision].[ext]")    sshResolver.latestStrategy =
            new org.apache.ivy.plugins.latest.LatestTimeStrategy()    sshResolver.changingPattern = ".*SNAPSHOT"    sshResolver.setCheckmodified(true)    resolver sshResolver
}
grails -classpath /path/to/jsch compile|run-app|etc.
CLASSPATH环境变量中,不要要注意,这可能会影响很多的Java应用。在Unix下,你可以为grails -classpath ...创建一个别名,这样就可以不需要每次都敲额外的参数了。Authentication
If your repository requires authentication you can configure this using acredentials block:credentials {
realm = ".."
host = "localhost"
username = "myuser"
password = "mypass"
}USER_HOME/.grails/settings.groovy file using the grails.project.ivy.authentication setting:grails.project.ivy.authentication = {
credentials {
    realm = ".."
    host = "localhost"
    username = "myuser"
    password = "mypass"
}
}验证
如果你的存储仓库需要验证,那么你可以通过credentials代码块来进行配置,比如:credentials {
realm = ".."
host = "localhost"
username = "myuser"
password = "mypass"
}USER_HOME/.grails/settings.groovy文件中的grails.project.ivy.authentication来实现:grails.project.ivy.authentication = {
credentials {
    realm = ".."
    host = "localhost"
    username = "myuser"
    password = "mypass"
}
}3.7.3 调试解析
If you are having trouble getting a dependency to resolve you can enable more verbose debugging from the underlying engine using the A common issue is that the checksums for a dependency don't match the associated JAR file, and so Ivy rejects the dependency. This helps ensure that the dependencies are valid. But for a variety of reasons some dependencies simply don't have valid checksums in the repositories, even if they are valid JARs. To get round this, you can disable Ivy's dependency checks like so:This is a global setting, so only use it if you have to.
如果你解析依赖遇到了问题的话,你可以使用基本的log method:// log level of Ivy resolver, either 'error', 'warn',
// 'info', 'debug' or 'verbose'
log "warn"grails.project.dependency.resolution = {
…
log "warn"
checksums false
…
}log方法来显示更多的调试信息:// log level of Ivy resolver, either 'error', 'warn',
// 'info', 'debug' or 'verbose'
log "warn"grails.project.dependency.resolution = {
…
log "warn"
checksums false
…
}3.7.4 依赖继承
By default every Grails application inherits several framework dependencies. This is done through the line:Inside the
缺省情况下,每一个Grails应用都继承多个框架依赖,配置如下:inherits "global"BuildConfig.groovy file. To exclude specific inherited dependencies you use the excludes method:inherits("global") { excludes "oscache", "ehcache" }
inherits "global"BuildConfig.groovy文件中,你可以通过excludes方法来排除掉指定的依赖,比如:inherits("global") { excludes "oscache", "ehcache" }
3.7.5 缺省的依赖
Most Grails applications have runtime dependencies on several jar files that are provided by the Grails framework. These include libraries like Spring, Sitemesh, Hibernate etc. When a war file is created, all of these dependencies will be included in it. But, an application may choose to exclude these jar files from the war. This is useful when the jar files will be provided by the container, as would normally be the case if multiple Grails applications are deployed to the same container.The dependency resolution DSL provides a mechanism to express that all of the default dependencies will be provided by the container. This is done by invoking the
大部分的Grails应用依赖于Grails框架自带的一些jar文件,比如Spring、Sitemesh和Hibernate等等。当创建一个war文件的时候。但是应用还是可以选择从war中排除这些jar文件的。这非常适合于本身容器已经包含这些jar文件的情况,尤其多个Grails应用部署于这样同一容器中。解析依赖的DSL就有让容器提供缺省依赖的选项,这可以通过传递defaultDependenciesProvided method and passing true as an argument:grails.project.dependency.resolution = { defaultDependenciesProvided true // all of the default dependencies will
// be "provided" by the container inherits "global" // inherit Grails' default dependencies repositories {
grailsHome()
…
}
dependencies {
…
}
}defaultDependenciesProvidedmust come beforeinherits, otherwise the Grails dependencies will be included in the war.
true给defaultDependenciesProvided方法来实现:grails.project.dependency.resolution = { defaultDependenciesProvided true // all of the default dependencies will
// be "provided" by the container inherits "global" // inherit Grails' default dependencies repositories {
grailsHome()
…
}
dependencies {
…
}
}defaultDependenciesProvided必须位于inherits之前,否则Grails的依赖还是会被包含到war中。
3.7.6 快照和其他变化的依赖
Typically, dependencies are constant. That is, for a given combination of There is a caveat to the support for changing dependencies that you should be aware of. Grails will stop looking for newer versions of a dependency once it finds a remote repository that has the dependency.Consider the following setup:In this example we are using the local maven repository and a remote network maven repository. Assuming that the local Grails dependency and the local Maven cache do not contain the dependency but the remote repository does, when we perform dependency resolution the following actions will occur:
通常情况下,依赖是不变的。或者说,对于给定了group, name and version the jar (or plugin) that it refers to will never change. The Grails dependency management system uses this fact to cache dependencies in order to avoid having to download them from the source repository each time. Sometimes this is not desirable. For example, many developers use the convention of a snapshot (i.e. a dependency with a version number ending in “-SNAPSHOT”) that can change from time to time while still retaining the same version number. We call this a "changing dependency".Whenever you have a changing dependency, Grails will always check the remote repository for a new version. More specifically, when a changing dependency is encountered during dependency resolution its last modified timestamp in the local cache is compared against the last modified timestamp in the dependency repositories. If the version on the remote server is deemed to be newer than the version in the local cache, the new version will be downloaded and used.{info}
Be sure to read the next section on “Dependency Resolution Caching” in addition to this one as it affects changing dependencies.
{info}All dependencies (jars and plugins) with a version number ending in -SNAPSHOT are implicitly considered to be changing by Grails. You can also explicitly specify that a dependency is changing by setting the changing flag in the dependency DSL:runtime ('org.my:lib:1.2.3') {
changing = true
}grails.project.dependency.resolution = {
repositories {
mavenLocal()
mavenRepo "http://my.org/repo"
}
dependencies {
compile "myorg:mylib:1.0-SNAPSHOT"
}- maven local repository is searched, dependency not found
- maven network repository is searched, dependency is downloaded to the cache and used
BuildConfig.groovy file.If we perform dependency resolution again without the dependency changing on the remote server, the following will happen:
- maven local repository is searched, dependency not found
- maven network repository is searched, dependency is found to be the same “age” as the version in the cache so will not be updated (i.e. downloaded)
mylib 1.0-SNAPSHOT is published changing the version on the server. The next time we perform dependency resolution, the following will happen:
- maven local repository is searched, dependency not found
- maven network repository is searched, dependency is found to newer than version in the cache so will be updated (i.e. downloaded to the cache)
mylib library. To do this we build it locally and install it to the local Maven cache (how doesn't particularly matter). The next time we perform a dependency resolution, the following will occur:
- maven local repository is searched, dependency is found to newer than version in the cache so will be updated (i.e. downloaded to the cache)
- maven network repository is NOT searched as we've already found the dependency
mylib 1.0-SNAPSHOT is published changing the version on the server. The next time we perform dependency resolution, the following will happen:
- maven local repository is searched, dependency is found to be the same “age” as the version in the cache so will not be updated (i.e. downloaded)
- maven network repository is NOT searched as we've already found the dependency
mylib 1.0-SNAPSHOT in the remote repository), you can either:
- Delete the version from the local maven repository, or
- Reorder the repositories in the
BuildConfig.groovyfile
This changing dependency behaviour is an unmodifiable characteristic of the underlying dependency management system that Grails uses, Apache Ivy. It is currently not possible to have Ivy search all repositories to look for newer versions (in terms of modification date) of the same dependency (i.e. the same combination ofgroup,nameandversion).
group、name和version组合的jar(或者插件)来说,就意味着将永远不变。Grails的依赖管理系统就是利用这点来缓存依赖以避免每次从远程存储库中下载。但有时候这并不是可取的。比如很多开发者使用的是 快照 (例如依赖一个以“-SNAPSHOT”结尾的版本号)规约,这样就是在同一个版本下,也可以一次一次的更新变化。我们称之为“变化的依赖”。每当你有一个变化依赖的时候,Grails将总是从远程存储库中检查新版本。更确切地说,当依赖解析处理一个变化依赖时,其本地缓存的最新时间戳将跟依赖存储库中的最新时间戳比较。如果远程服务器的版本比本地缓存的新,那么新的版本将被下载和使用。{info}
除此之外,请务必阅读下一节的“依赖解析缓存”,因为它将影响变化的依赖。
{info}所有版本号以-SNAPSHOT结尾的依赖(jar和插件),Grails将 隐含地 将其视为变化的。你也可以通过changing标记来显式的在依赖DSL中指定变化的依赖:runtime ('org.my:lib:1.2.3') {
changing = true
}grails.project.dependency.resolution = {
repositories {
mavenLocal()
mavenRepo "http://my.org/repo"
}
dependencies {
compile "myorg:mylib:1.0-SNAPSHOT"
}- 在maven的本地存储库中查找,依赖没有找到
- 在maven的网络存储库中查找,依赖将被下载到本地缓存中并且使用它
BuildConfig.groovy文件中的。如果远程服务器依赖没有变化,我们再执行依赖解析的话,将发生如下情况:
- 在maven的本地存储库中查找,依赖没有找到
- 在maven的网络存储库中查找,依赖被发现跟本地缓存是同一个版本,因此也就不会更新(比如下载)
mylib 1.0-SNAPSHOT被发布到服务器上。接下来我们再执行依赖解析,将会发生如下情况:
- 在maven的本地存储库中查找,依赖没有找到
- 在maven的网络存储库中查找,依赖被发现比本地缓存的版本新,因此执行更新操作(比如将其下载到本地缓存中)
mylib库的一些本地变动。要完成此事,我们需要在本地构建并且将其安装到Maven的本地缓存中(如果没有什么特别问题的话)。接下来,我们执行依赖解析,将发生如下情况:
- 在maven的本地存储库中查找,依赖被发现比本地缓存的版本新,因此执行更新操作(比如将其下载到本地缓存中)
- 不再查找maven的网络存储库,因为我们已经找到了依赖
mylib 1.0-SNAPSHOT。然后,我们执行依赖解析,将发生如下情况:
- 在maven的本地存储库中查找,依赖被发现跟本地缓存是同一个版本,因此也就不会更新(比如下载)
- 不再查找maven的网络存储库,因为我们已经找到了依赖
mylib 1.0-SNAPSHOT 新 版本构建问题),你可以有下边两个选择:
- 删除maven的本地存储库中的版本,或者
- 给
BuildConfig.groovy文件中的repositories重新排序
此变化依赖的行为是Apache Ivy(是Grails的依赖管理系统基础)一个不可变特性。目前,Ivy是不可能搜索全部的存储库来寻找同一个依赖(比如相同group、name和version的组合)的最新版本(修改时间的同名词)。
3.7.7 依赖报告
As mentioned in the previous section a Grails application consists of dependencies inherited from the framework, the plugins installed and the application dependencies itself.To obtain a report of an application's dependencies you can run the dependency-report command:By default this will generate reports in the
正如前面提到的,Grails应用所依赖的主要来自系统框架,已经安装的插件和应用自身的依赖。要获取应用的依赖情况报告,可以运行dependency-report命令:grails dependency-report
target/dependency-report directory. You can specify which configuration (scope) you want a report for by passing an argument containing the configuration name:grails dependency-report runtime
grails dependency-report
target/dependency-report目录下。你也可以通过传递一个配置(又称范围)名称来生成特定的报告,比如:grails dependency-report runtime
3.7.8 插件的JAR依赖
Specifying Plugin JAR dependencies
The way in which you specify dependencies for a plugin is identical to how you specify dependencies in an application. When a plugin is installed into an application the application automatically inherits the dependencies of the plugin.To define a dependency that is resolved for use with the plugin but not exported to the application then you can set theexport property of the dependency:test('org.spockframework:spock-core:0.5-groovy-1.8') {
export = false
}test group: 'org.spockframework', name: 'spock-core',
version: '0.5-groovy-1.8', export: falseYou can useexported = falseinstead ofexport = false, but we recommend the latter because it's consistent with the Map argument.
指定插件的JAR依赖
为一个插件指定依赖的方式跟你为一个应用的方式一致。当一个插件被安装以后,此应用将自动继承插件的依赖。如果希望插件的依赖 不要导出 到应用中,可以通过设置export属性来完成:test('org.spockframework:spock-core:0.5-groovy-1.8') {
export = false
}test group: 'org.spockframework', name: 'spock-core',
version: '0.5-groovy-1.8', export: false你也可以使用exported = false来替代export = false,但是我们推荐你使用后者,因为这样可以跟Map参数保持一致。
Overriding Plugin JAR Dependencies in Your Application
If a plugin is using a JAR which conflicts with another plugin, or an application dependency then you can override how a plugin resolves its dependencies inside an application using exclusions. For example:plugins {
compile(":hibernate:$grailsVersion") {
excludes "javassist"
}
}dependencies {
runtime "javassist:javassist:3.4.GA"
}excludes method, effectively excluding the javassist library as a dependency.
在应用中覆盖插件依赖
如果一个插件使用到的JAR依赖跟另外一个插件或者应用的依赖相冲突,你可以使用排除加覆盖的方式来解决,比如:plugins {
compile(":hibernate:$grailsVersion") {
excludes "javassist"
}
}dependencies {
runtime "javassist:javassist:3.4.GA"
}excludes方法排除掉javassist框架,而后另外声明其依赖。
3.7.9 Maven集成
When using the Grails Maven plugin, Grails' dependency resolution mechanics are disabled as it is assumed that you will manage dependencies with Maven's The line
当使用Grails的Maven插件时,Grails自带的依赖解析机制将被禁止,因为其假设你已经使用Maven的pom.xml file.However, if you would like to continue using Grails regular commands like run-app, test-app and so on then you can tell Grails' command line to load dependencies from the Maven pom.xml file instead.To do so simply add the following line to your BuildConfig.groovy:grails.project.dependency.resolution = {
pom true
..
}pom true tells Grails to parse Maven's pom.xml and load dependencies from there.
pom.xml来管理依赖了。即使这样,你如果想继续使用Grails的常规命令比如run-app、test-app等等,你还是可以通过其命令行从Maven的pom.xml加载依赖的。你只需要在BuildConfig.groovy文件中简单加入如下即可:grails.project.dependency.resolution = {
pom true
..
}pom true就是用来告诉Grails要使用Maven的pom.xml来加载依赖。
3.7.10 部署到Maven存储库
If you use Maven to build your Grails project, you can use the standard Maven targets
如果你是使用Maven来构建你的Grails工程,那么你可以使用标准的Maven目标命令(target)mvn install and mvn deploy.
If not, you can deploy a Grails project or plugin to a Maven repository using the maven-publisher plugin.The plugin provides the ability to publish Grails projects and plugins to local and remote Maven repositories. There are two key additional targets added by the plugin:
- maven-install - Installs a Grails project or plugin into your local Maven cache
- maven-deploy - Deploys a Grails project or plugin to a remote Maven repository
pom.xml for you unless a pom.xml is already present in the root of the project, in which case this pom.xml file will be used.
mvn install和mvn deploy来安装部署。
如果不是,你可以通过maven-publisher插件来将Grails工程或者插件部署到Maven存储库。此插件能够将Grails工程和插件发布到本地和远程的Maven存储库,下面是此插件额外的目标命令:
- maven-install - 安装Grails工程或者插件到你本地的Maven缓存中
- maven-deploy - 部署Grails工程或者插件到远程的Maven存储库中
pom.xml,此插件将为你自动生成此文件,否则系统将直接使用已经存在的pom.xml文件。maven-install
Themaven-install command will install the Grails project or plugin artifact into your local Maven cache:grails maven-install
maven-install
maven-install命令将安装Grails工程或者插件到你本地的Maven缓存:grails maven-install
maven-deploy
Themaven-deploy command will deploy a Grails project or plugin into a remote Maven repository:grails maven-deploy
<distributionManagement> configuration within a pom.xml or that you specify the id of the remote repository to deploy to:grails maven-deploy --repository=myRepo
repository argument specifies the 'id' for the repository. Configure the details of the repository specified by this 'id' within your grails-app/conf/BuildConfig.groovy file or in your $USER_HOME/.grails/settings.groovy file:grails.project.dependency.distribution = {
localRepository = "/path/to/my/local"
remoteRepository(id: "myRepo", url: "http://myserver/path/to/repo")
}<remoteRepository id="myRepo" url="scp://localhost/www/repository"> <authentication username="..." privateKey="${user.home}/.ssh/id_dsa"/> </remoteRepository>
remoteRepository(id: "myRepo", url: "scp://localhost/www/repository") {
    authentication username: "...", privateKey: "${userHome}/.ssh/id_dsa"
}
grails maven-deploy --repository=myRepo --protocol=webdav
- http
- scp
- scpexe
- ftp
- webdav
maven-deploy
maven-deploy命令将Grails工程或者插件发布到远程的Maven存储库:grails maven-deploy
pom.xml文件的<distributionManagement>,或者你可以通过指定远程存储库id的方式,比如:grails maven-deploy --repository=myRepo
repository参数是存储库的'id',此'id'的详细配置位于grails-app/conf/BuildConfig.groovy或者$USER_HOME/.grails/settings.groovy文件中:grails.project.dependency.distribution = {
localRepository = "/path/to/my/local"
remoteRepository(id: "myRepo", url: "http://myserver/path/to/repo")
}<remoteRepository id="myRepo" url="scp://localhost/www/repository"> <authentication username="..." privateKey="${user.home}/.ssh/id_dsa"/> </remoteRepository>
remoteRepository(id: "myRepo", url: "scp://localhost/www/repository") {
    authentication username: "...", privateKey: "${userHome}/.ssh/id_dsa"
}
grails maven-deploy --repository=myRepo --protocol=webdav
- http
- scp
- scpexe
- ftp
- webdav
Groups, Artifacts and Versions
Maven defines the notion of a 'groupId', 'artifactId' and a 'version'. This plugin pulls this information from the Grails project conventions or plugin descriptor.Projects
For applications this plugin will use the Grails application name and version provided by Grails when generating thepom.xml file. To change the version you can run the set-version command:grails set-version 0.2
groupId will be the same as the project name, unless you specify a different one in Config.groovy:grails.project.groupId="com.mycompany"组,工件和版本
在Maven中,定义了'groupId','artifactId'和'version'概念,Maven插件会将Grails工程或者插件的描述转换为这些相应的定义。工程
对于一个应用来说,当要生成pom.xml文件的时候,此插件会根据Grails应用提供的名称和版本进行生成。要修改版本信息,可以运行set-version命令来完成:grails set-version 0.2
groupId跟其工程名称一样,不过你可以在Config.groovy中指定,比如:grails.project.groupId="com.mycompany"Plugins
With a Grails plugin thegroupId and version are taken from the following properties in the *GrailsPlugin.groovy descriptor:String groupId = 'myOrg' String version = '0.1'
FeedsGrailsPlugin the artifactId will be "feeds". If your plugin does not specify a groupId then this defaults to "org.grails.plugins".
插件
对于一个Grails插件来说,其groupId和version来自于*GrailsPlugin.groovy文件的描述属性:String groupId = 'myOrg' String version = '0.1'
FeedsGrailsPlugin那么其artifactId是"feeds"。如果你的插件没有指定groupId那么其缺省值为"org.grails.plugins"。
3.7.11 插件依赖
As of Grails 1.3 you can declaratively specify plugins as dependencies via the dependency DSL instead of using the install-plugin command:If you don't specify a group id the default plugin group id of
从Grails 1.3以来,你就可以通过依赖DSL的方式来声明插件的依赖了,而非只用install-plugin命令:grails.project.dependency.resolution = {
…
repositories {
…
} plugins {
runtime ':hibernate:1.2.1'
} dependencies {
…
}
…
}org.grails.plugins is used. You can specify to use the latest version of a particular plugin by using "latest.integration" as the version number:plugins {
runtime ':hibernate:latest.integration'
}grails.project.dependency.resolution = {
…
repositories {
…
} plugins {
runtime ':hibernate:1.2.1'
} dependencies {
…
}
…
}org.grails.plugins。你还可以将"latest.integration"作为版本号,这样就会自动获取最新的版本,例如:plugins {
runtime ':hibernate:latest.integration'
}Integration vs. Release
The "latest.integration" version label will also include resolving snapshot versions. To not include snapshot versions then use the "latest.release" label:plugins {
runtime ':hibernate:latest.release'
}The "latest.release" label only works with Maven compatible repositories. If you have a regular SVN-based Grails repository then you should use "latest.integration".And of course if you use a Maven repository with an alternative group id you can specify a group id:
plugins {
    runtime 'mycompany:hibernate:latest.integration'
}
集成(Integration)和正式(Release)版本
"latest.integration"的版本标签将会解析包含快照的版本,如果不想,可以使用"latest.release"标签:plugins {
runtime ':hibernate:latest.release'
}"latest.release"标签仅仅用于兼容Maven的存储库。如果你使用基于SVN的Grails存储库,你应该使用"latest.integration"。当然如果你使用非缺省组ID的Maven存储库,你可以为其指定一个:
plugins {
    runtime 'mycompany:hibernate:latest.integration'
}
Plugin Exclusions
You can control how plugins transitively resolves both plugin and JAR dependencies using exclusions. For example:plugins {
runtime(':weceem:0.8') {
excludes "searchable"
}
}excludes method you can tell Grails not to transitively install the searchable plugin. You can combine this technique to specify an alternative version of a plugin:plugins {
runtime(':weceem:0.8') {
excludes "searchable" // excludes most recent version
}
runtime ':searchable:0.5.4' // specifies a fixed searchable version
}plugins {
runtime(':weceem:0.8') {
transitive = false
}
runtime ':searchable:0.5.4' // specifies a fixed searchable version
}插件的排除
通过使用排除,你可以控制插件如何传递地解析JAR和插件的依赖,比如:plugins {
runtime(':weceem:0.8') {
excludes "searchable"
}
}excludes方法,你可以告诉Grails 不以 传递的方式安装searchable插件。你可以在此种方式的基础上,另外单独安装另一个版本的插件:plugins {
runtime(':weceem:0.8') {
excludes "searchable" // excludes most recent version
}
runtime ':searchable:0.5.4' // specifies a fixed searchable version
}plugins {
runtime(':weceem:0.8') {
transitive = false
}
runtime ':searchable:0.5.4' // specifies a fixed searchable version
}