
2 起步 - Reference Documentation
Authors: Graeme Rocher, Peter Ledbrook, Marc Palmer, Jeff Brown, Luke Daley, Burt Beckwith
Version: null
Table of Contents
2 起步
2.1 安装的前提条件
Before installing Grails you will as a minimum need a Java Development Kit (JDK) installed version 1.6 or above and environment variable called Note that although JDK 1.6 is required to use Grails at development time it is possible to deploy Grails to JDK 1.5 VMs by setting the In addition, Grails supports Servlet versions 2.5 and above. If you wish to use newer features of the Servlet API (such as 3.0) you should configure the
在安装Grails以前,你至少需要先安装1.6或者更高版本的JDK,并且设置名为JAVA_HOME pointing to the location of this installation. On some platforms (for example OS X) the Java installation is automatically detected. However in many cases you will want to manually configure the location of Java. For example:export JAVA_HOME=/Library/Java/Home
export PATH="$PATH:$JAVA_HOME/bin"grails.project.source.level and grails.project.target.level settings to "1.5" in grails-app/conf/BuildConfig.groovy:grails.project.source.level = 1.5 grails.project.target.level = 1.5
grails.servlet.version in BuildConfig.groovy appropriately:grails.servlet.version = "3.0"JAVA_HOME全局环境变量来指向它。有些平台(比如OS X),Java的安装是自动检测的,但是还是有不少的平台是需要手工来配置Java的安装位置的,比如:export JAVA_HOME=/Library/Java/Home
export PATH="$PATH:$JAVA_HOME/bin"grails-app/conf/BuildConfig.groovy中的grails.project.source.level和grails.project.target.level值为"1.5":grails.project.source.level = 1.5 grails.project.target.level = 1.5
BuildConfig.groovy中的grails.servlet.version为合适的值才行,比如:grails.servlet.version = "3.0"2.2 下载安装Grails
The first step to getting up and running with Grails is to install the distribution. To do so follow these steps:
首先需要下载Grails的发行包并进行安装,执行步骤如下:
- Download a binary distribution of Grails and extract the resulting zip file to a location of your choice
- Set the GRAILS_HOME environment variable to the location where you extracted the zip
- On Unix/Linux based systems this is typically a matter of adding something like the following
export GRAILS_HOME=/path/to/grailsto your profile - On Windows this is typically a matter of setting an environment variable under
My Computer/Advanced/Environment Variables - Then add the
bindirectory to yourPATHvariable: - On Unix/Linux based systems this can be done by adding
export PATH="$PATH:$GRAILS_HOME/bin"to your profile - On Windows this is done by modifying the
Pathenvironment variable underMy Computer/Advanced/Environment Variables
grails -version in the terminal window and see output similar to this:
Grails version: 2.0.0
- 下载 Grails二进制发行包并解压到指定的文件目录下
- 在环境变量中添加GRAILS_HOME,值为上一步解压的文件目录。
- Unix/Linux系统中,通常将
export GRAILS_HOME=/path/to/grails追加到到用户的启动配置文件中(通常是.profile或者.bashrc等-译者注) - Windows系统上右击“我的电脑”/“属性”/“高级”/“环境变量”,点击新建。
- 将GRAILS_HOME的
bin目录追加到系统的PATH变量中: - Unix/Linux系统中,通常将
export PATH="$PATH:$GRAILS_HOME/bin"追加到到用户的启动配置文件中(同上) - Windows系统上右击“我的电脑”/“属性”/“高级”/“环境变量”,修改PATH变量的值。
grails -version 如果屏幕上显示如下提示则说明安装成功:
Grails version: 2.0.02.3 从老版本Grails升级
Although the Grails development team have tried to keep breakages to a minimum there are a number of items to consider when upgrading a Grails 1.0.x, 1.1.x, 1.2.x, or 1.3.x applications to Grails 2.0. The major changes are described in detail below.
虽然Grails的开发团队已经尽最大可能地将破坏减少到最少,但是当从1.0.x、1.1.x、1.2.x或者1.3.x升级到2.0的时候,依然有很多注意事项。下面详细地描述了这些重要变化。从Grails 1.3.x升级
HSQLDB Has Been Replaced With H2
HSQLDB is still bundled with Grails but is not configured as a default runtime dependency. Upgrade options include replacing HSQLDB references in DataSource.groovy with H2 references or adding HSQLDB as a runtime dependency for the application.If you want to run an application with different versions of Grails, it's simplest to add HSQLDB as a runtime dependency, which you can do in BuildConfig.groovy:grails.project.dependency.resolution = {
inherits("global") {
}
repositories {
grailsPlugins()
grailsHome()
grailsCentral()
} dependencies {
// Add HSQLDB as a runtime dependency
runtime 'hsqldb:hsqldb:1.8.0.10'
}
}dataSource {
driverClassName = "org.h2.Driver"
username = "sa"
password = ""
}
// environment specific settings
environments {
development {
dataSource {
dbCreate = "create-drop" // one of 'create', 'create-drop','update'
url = "jdbc:h2:mem:devDb"
}
}
test {
dataSource {
dbCreate = "update"
url = "jdbc:h2:mem:testDb"
}
}
production {
dataSource {
dbCreate = "update"
url = "jdbc:h2:prodDb"
}
}
}byte[] domain class properties. HSQLDB's default BLOB size is large and so you typically don't need to specify a maximum size. But H2 defaults to a maximum size of 255 bytes! If you store images in the database, the saves are likely to fail because of this. The easy fix is to add a maxSize constraint to the byte[] property:class MyDomain {
byte[] data static constraints = {
data maxSize: 1024 * 1024 * 2 // 2MB
}
}data column set to BINARY(2097152) by Hibernate.
H2代替HSQLDB
Grails依然自带HSQLDB,但在配置中已经没有了运行时依赖。升级的选择可以是将DataSource.groovy中的HSQLDB替换为H2,或者在你的应用中增加运行时依赖。如果你想让你的应用运行在不同的Grails版本中,那么最简单的方法就是在BuildConfig.groovy中增加HSQLDB的运行时依赖,如下所示:grails.project.dependency.resolution = {
inherits("global") {
}
repositories {
grailsPlugins()
grailsHome()
grailsCentral()
} dependencies {
// Add HSQLDB as a runtime dependency
runtime 'hsqldb:hsqldb:1.8.0.10'
}
}dataSource {
driverClassName = "org.h2.Driver"
username = "sa"
password = ""
}
// environment specific settings
environments {
development {
dataSource {
dbCreate = "create-drop" // one of 'create', 'create-drop','update'
url = "jdbc:h2:mem:devDb"
}
}
test {
dataSource {
dbCreate = "update"
url = "jdbc:h2:mem:testDb"
}
}
production {
dataSource {
dbCreate = "update"
url = "jdbc:h2:prodDb"
}
}
}byte[] 属性的处理。HSQLDB中其BLOB已经足够大,以至于无需再设定最大值了。而H2其默认最大值是255字节,因此如果要在数据库中存储图像,其保存失败多不半是因为此限制。要解决此问题,只需在 byte[] 属性中增加一个 maxSize 约束,比如:class MyDomain {
byte[] data static constraints = {
data maxSize: 1024 * 1024 * 2 // 2MB
}
}data 字段设置为 BINARY(2097152) 。Abstract Inheritance Changes
In previous versions of Grails abstract classes ingrails-app/domain were not treated as persistent. This is no longer the case and has a significant impact on upgrading your application. For example consider the following domain model in a Grails 1.3.x application:abstract class Sellable {} class Book extends Sellable {}
Sellable class would be stored within the BOOK table. However, in Grails 2.0.x you will get SELLABLE table and the default table-per-hierarchy inheritance rules apply with all properties of the Book stored in the SELLABLE table.You have two options when upgrading in this scenario:
- Move the abstract
Sellableclass into the src/groovy package. If theSellableclass is in thesrc/groovydirectory it will no longer be regarded a persistent - Use the database migration plugin to apply the appropriate changes to the database (typically renaming the table to the root abstract class of the inheritance tree)
抽象继承的变化
在以前版本的Grails中,grails-app/domain 下的抽象类并没有被持久化。现在这个情况已经不复存在,而且对升级你的应用的来说,也有着重要的影响。比如以下Grails 1.3.x应用的领域模型:abstract class Sellable {} class Book extends Sellable {}
Sellable 类的属性将存储在 BOOK 表中。但是在Grails 2.0.x中,你将生成 SELLABLE 表,并且使用缺省的单表继承(table-per-hierarchy)的继承规则的话,那么 Book 中的所有属性将存储在 SELLABLE 表中。这种情况下的升级,你有两种选择:
- 将抽象类
Sellable移至src/groovy目录下。如果Sellable类在src/groovy目录下边,那么将不再被持久化。 - 使用 数据库迁移 插件让这些变化在数据库中生效(通常是将表名重新命名为继承树中跟抽象类的名称)
Criteria Queries Default to INNER JOIN
The previous default of LEFT JOIN for criteria queries across associations is now INNER JOIN.条件查询缺省使用内连接(INNER JOIN)
相比以前的左连接(LEFT JOIN),现在关联查询使用内连接了。Invalid Constraints Now Thrown an Exception
Previously if you defined a constraint on a property that doesn't exist no error would be thrown:class Person {
String name
static constraints = {
bad nullable:false // invalid property, no error thrown
}
}约束无效时抛出异常
在以前的版本中,如果你在约束中定义了一个不存在的属性,没有任何异常被抛出,比如:class Person {
String name
static constraints = {
bad nullable:false // invalid property, no error thrown
}
}Logging By Convention Changes
The packages that you should use for Grails artifacts have mostly changed. In particular:service->servicescontroller->controllerstagLib->taglib(case change)bootstrap->confdataSource->conf
log property into artefacts at compile time.
日志规约的变化
你使用的Grails工件包名大部分发生了改变,特别是以下几个:service->servicescontroller->controllerstagLib->taglib(大小写变化)bootstrap->confdataSource->conf
log 属性在编译时就注入到工件类中。jQuery Replaces Prototype
The Protoype Javascript library has been removed from Grails core and now new Grails applications have the jQuery plugin configured by default. This will only impact you if you are using Prototype with the adaptive AJAX tags in your application, e.g. <g:remoteLink/> etc, because those tags will break as soon as you upgrade.To resolve this issue, simply install the Prototype plugin in your application. You can also remove the prototype files from yourweb-app/js/prototype directory if you want.
jQuery替代Prototype
Protoype库已经从Grails核心中移除了,取而代之的是jQuery插件。这将影响你应用中使用Prototype的AJAX标签,比如 <g:remoteLink/> 等,因为这些标签会在你升级后失效。要解决此问题,只需要在你应用中安装 Prototype插件 即可,或者移除web-app/js/prototype 目录下的prototype文件。Access Control and Resources
The Resources plugin is a great new feature of Grails, but you do need to be aware that it adds an extra URL at/static. If you have access control in your application, this may mean that the static resources require an authenticated user to load them! Make sure your access rules take account of the /static URL.
访问控制和资源
Resources插件是Grails非常棒的新特性,但前提是需要增加一个额外的/static URL地址。如果你的应用中有权限访问控制的话,这意味着这些静态资源也需要授权用户才能加载他们,因此一定要确定你的访问控制规则已经包含了 /static URL地址Controller Public Methods
As of Grails 2.0, public methods of controllers are now treated as actions in addition to actions defined as traditional Closures. If you were relying on the use of methods for privacy controls or as helper methods then this could result in unexpected behavior. To resolve this issue you should mark all methods of your application that are not to be exposed as actions asprivate methods.
控制器的Public方法
在Grails 2.0的控制器中,除了传统的必包动作以外,还将公共方法也视为动作。这意味着如果你将这些公共方法作为私有控制或者辅助方法的话,将会导致不可预知的结果。要解决此问题,只需要将应用中不希望暴露为动作的方法全部标记为private 方法。The redirect Method
The redirect method no longer commits the response. The result of this is code that relies of this behavior will break in 2.0. For example:redirect action: "next" if (response.committed) { // do something }
response.committed property would return true and the if block will execute. In Grails 2.0 this is no longer the case and you should instead use the new isRedirected() method of the request object:redirect action: "next" if (request.redirected) { // do something }
grails.serverURL configuration option if it's set. Previous versions of Grails included default values for all the environments, but when upgrading to Grails 2.0 those values more often than not break redirection. So, we recommend you remove the development and test settings for grails.serverURL or replace them with something appropriate for your application.
redirect方法
redirect 方法不再提交响应,因此依赖此行为的代码在2.0中不再有效,比如:redirect action: "next" if (response.committed) { // do something }
response.committed 属性将返回true,并且其 if 代码块将得到执行。而在Grails 2.0中,要使上述代码可以工作,需要使用 request 的 isRedirected() 方法来替代之,如下:redirect action: "next" if (request.redirected) { // do something }
grails.serverURL 被设置,那么它将一直使用此值,而以前版本Grails的缺省值是应用于全部环境的,但是升级到Grails 2.0后,这些值往往不是中断重定向。因此我们推荐你移除开发和测试环境中 grails.serverURL 的设置,或者将他们替换为合适的值。Content Negotiation
As of Grails 2.0 the withFormat method of controllers no longer takes into account the request content type (dictated by theCONTENT_TYPE header), but instead deals exclusively with the response content type (dictated by the ACCEPT header or file extension). This means that if your application has code that relies on reading XML from the request using withFormat this will no longer work:def processBook() {
withFormat {
xml {
// read request XML
}
html {
// read request parameters
}
}
}withFormat method provided on the request object:def processBook() {
request.withFormat {
xml {
// read request XML
}
html {
// read request parameters
}
}
}内容协商(Content Negotiation)
Grails 2.0的控制器方法 withFormat 依赖的不再是请求内容类型(通过CONTENT_TYPE 来确定),而是响应内容类型(通过 ACCEPT 或者文件的扩展名来确定)。换句话说,如果你的应用代码中依赖请求的 withFormat 将不再有效,比如:def processBook() {
withFormat {
xml {
// read request XML
}
html {
// read request parameters
}
}
}request 的 withFormat 方法,如下所示:def processBook() {
request.withFormat {
xml {
// read request XML
}
html {
// read request parameters
}
}
}Command Line Output
Ant output is now hidden by default to keep the noise in the terminal to a minimum. That means if you useant.echo in your scripts to communicate messages to the user, we recommend switching to an alternative mechanism.For status related messages, you can use the event system:event "StatusUpdate", ["Some message"] event "StatusFinal", ["Some message"] event "StatusError", ["Some message"]
grailsConsole script variable, which gives you access to an instance of GrailsConsole. In particular, you can log information messages with log() or info(), errors and warnings with error() and warning(), and request user input with userInput().
命令行输出
缺省情况下,为了让字符终端的干扰减少到最少,Ant的输出信息现在已经被屏蔽了。换句话说,如果你的脚本中使用ant.echo 来显示用户信息,我们推荐你使用其他机制。对跟状态相关的信息来说,你可以使用event系统,比如:event "StatusUpdate", ["Some message"] event "StatusFinal", ["Some message"] event "StatusError", ["Some message"]
grailsConsole 脚本变量,它是 GrailsConsole的一个实例。此外你还可以使用 log() 或者 info() 来记录日志信息,使用 error() 和 warning() 来记录错误和警告信息,使用 userInput() 来获取用户的输入。Ivy cache location has changed
The default Ivy cache location for Grails has changed. If the thought of yet another cache of JARs on your disk horrifies you, then you can change this in yoursettings.groovy:grails.dependency.cache.dir = "${userHome}/.ivy2/cache"Ivy缓存位置变化
Grails的缺省Ivy缓存位置已经改变。如果磁盘上多出来的另外一个JAR缓存让你不舒服,那你依然可以通过修改settings.groovy 来改变它,如下:grails.dependency.cache.dir = "${userHome}/.ivy2/cache"Updated Underlying APIs
Grails 2.0 contains updated dependencies including Servlet 3.0, Tomcat 7, Spring 3.1, Hibernate 3.6 and Groovy 1.8. This means that certain plugins and applications that that depend on earlier versions of these APIs may no longer work. For example the Servlet 3.0HttpServletRequest interface includes new methods, so if a plugin implements this interface for Servlet 2.5 but not for Servlet 3.0 then said plugin will break. The same can be said of any Spring interface.
更新基础API
Grails 2.0的依赖现在已经更新到Servlet 3.0、Tomcat 7、Spring 3.1、Hibernate 3.6和Groovy 1.8,这对某些依赖于以前版本API的插件和应用来说,将不会再工作。比如Servlet 3.0的HttpServletRequest 接口包含的新方法,将会导致那些依赖于Servlet 2.5的插件不再有效。同理,对任何Spring接口来说,也是一样。Removal of release-plugin
The built inrelease-plugin command for releases plugins to the central Grails plugin repository has been removed. The new release plugin should be used instead which provides an equivalent publish-plugin command.
移除release-plugin
内置的用于将插件发布到Grails官方插件存储库的release-plugin 命令已经被移除了,一个全新的 release 插件被用于做跟 publish-plugin 命令相同的工作。移除废弃类
已经废弃的类有:grails.web.JsonBuilder 和 grails.web.OpenRicoBuilder从Grails 1.2.x升级
Plugin Repositories
As of Grails 1.3, Grails no longer natively supports resolving plugins against secured SVN repositories. The plugin resolution mechanism in Grails 1.2 and below has been replaced by one built on Ivy, the upside of which is that you can now resolve Grails plugins against Maven repositories as well as regular Grails repositories.Ivy supports a much richer setter of repository resolvers for resolving plugins, including support for Webdav, HTTP, SSH and FTP. See the section on resolvers in the Ivy docs for all the available options and the section of plugin repositories in the user guide which explains how to configure additional resolvers.If you still need support for resolving plugins against secured SVN repositories then the IvySvn project provides a set of resolvers for SVN repositories.插件存储库
在Grails 1.3中,系统不再支持原生的具有安全SVN存储库的插件解析。从Grails 1.2以来,插件的解析机制就已经被内置的 Ivy所替代,这么做的好处是你不仅可以使用常规的Grails存储库,还可以使用Maven存储库来解析插件。对于解析插件来说,Ivy支持更丰富的存储库解析器设置,包括 Webdav、HTTP、SSH和FTP。更多有效的解析器请参考Ivy文档的 resolvers 章节,至于如何详尽的配置这些解析器,请参考本手册的 插件存储库如果你依旧使用安全SVN存储库,那么 IvySvn 工程为SVN存储库提供了一系列的解析器。从Grails 1.1.x升级
Plugin paths
In Grails 1.1.x typically apluginContextPath variable was used to establish paths to plugin resources. For example:<g:resource dir="${pluginContextPath}/images" file="foo.jpg" />
<g:resource dir="images" file="foo.jpg" />
<g:resource contextPath="" dir="images" file="foo.jpg" />
插件路径
在Grails 1.1.x中,通常使用pluginContextPath 变量来指定插件资源的路径,比如:<g:resource dir="${pluginContextPath}/images" file="foo.jpg" />
<g:resource dir="images" file="foo.jpg" />
<g:resource contextPath="" dir="images" file="foo.jpg" />
Tag and Body return values
Tags no longer returnjava.lang.String instances but instead return a Grails StreamCharBuffer instance. The StreamCharBuffer class implements all the same methods as String but doesn't extend String, so code like this will break:def foo = body() if (foo instanceof String) { // do something }
java.lang.CharSequence interface, which both String and StreamCharBuffer implement:def foo = body() if (foo instanceof CharSequence) { // do something }
标签及代码块(Body)的返回值
标签不再返回java.lang.String 类型实例了,取而代之的是Grails的 StreamCharBuffer 实例。 StreamCharBuffer 类没有继承自 String 但实现了跟 String 完全相同的方法,因此如下代码将不会如期的工作:def foo = body() if (foo instanceof String) { // do something }
java.lang.CharSequence 接口,因为 String 和 StreamCharBuffer 都实现了此接口:def foo = body() if (foo instanceof CharSequence) { // do something }
New JSONBuilder
There is a new version ofJSONBuilder which is semantically different from the one used in earlier versions of Grails. However, if your application depends on the older semantics you can still use the deprecated implementation by setting the following property to true in Config.groovy:grails.json.legacy.builder=true新的JSONBuilder
跟以前版本的Grails相比,新版本的JSONBuilder 在语法上有着显著的差异,尽管如此,如果你的应用依赖于旧有的要废弃的语法,你仍然可以通过设置Config.groovy中如下的属性为 true 的方式来实现:grails.json.legacy.builder=trueValidation on Flush
Grails now executes validation routines when the underlying Hibernate session is flushed to ensure that no invalid objects are persisted. If one of your constraints (such as a custom validator) executes a query then this can cause an additional flush, resulting in aStackOverflowError. For example:static constraints = { author validator: { a -> assert a != Book.findByTitle("My Book").author } }
StackOverflowError in Grails 1.2. The solution is to run the query in a new Hibernate session (which is recommended in general as doing Hibernate work during flushing can cause other issues):static constraints = { author validator: { a -> Book.withNewSession { assert a != Book.findByTitle("My Book").author } } }
Flush时校验
现在Grails将在Hibernate会话被清除(Flush)的时候才进行校验检查,这样就保证了只有有效的对象才能入库。如果你的约束(比如一个自定义的校验)执行一个查询,并且此查询将导致一个额外的清除,那么系统将抛出StackOverflowError 错误,比如:static constraints = { author validator: { a -> assert a != Book.findByTitle("My Book").author } }
StackOverflowError 错误,解决之道就是在新的Hibernate session 中运行查询(这也是因为Hibernate的清除导致问题所推荐的通用解决之道),比如:static constraints = { author validator: { a -> Book.withNewSession { assert a != Book.findByTitle("My Book").author } } }
从Grails 1.0.x升级
Groovy 1.6
Grails 1.1 and above ship with Groovy 1.6 and no longer supports code compiled against Groovy 1.5. If you have a library that was compiled with Groovy 1.5 you must recompile it against Groovy 1.6 or higher before using it with Grails 1.1.Groovy 1.6
Grails 1.1以后的版本已经采用Groovy 1.6,并且不再支持Groovy 1.5所编译的代码。因此如果你的库是Groovy 1.5编译的,那么在使用Grails 1.1以前,你必须要在Groovy 1.6或者更高版本重新编译才行。Java 5.0
Grails 1.1 now no longer supports JDK 1.4, if you wish to continue using Grails then it is recommended you stick to the Grails 1.0.x stream until you are able to upgrade your JDK.Java 5.0
Grails 1.1不再对JDK 1.4提供支持,因此在不能升级你的JDK期间,要想继续使用Grails,只能推荐你继续使用Grails 1.0.x系列。Configuration Changes
1) The settinggrails.testing.reports.destDir has been renamed to grails.project.test.reports.dir for consistency.2) The following settings have been moved from grails-app/conf/Config.groovy to grails-app/conf/BuildConfig.groovy:
grails.config.base.webXmlgrails.project.war.file(renamed fromgrails.war.destFile)grails.war.dependenciesgrails.war.copyToWebAppgrails.war.resources
grails.war.java5.dependencies option is no longer supported, since Java 5.0 is now the baseline (see above).4) The use of jsessionid (now considered harmful) is disabled by default. If your application requires jsessionid you can re-enable its usage by adding the following to grails-app/conf/Config.groovy:grails.views.enable.jsessionid=true配置的变化
1) 为了保持一致性,grails.testing.reports.destDir 已经被重新命名为 grails.project.test.reports.dir2) 以下一些配置已经从 grails-app/conf/Config.groovy 移到了 grails-app/conf/BuildConfig.groovy 中:
grails.config.base.webXmlgrails.project.war.file(原名是grails.war.destFile)grails.war.dependenciesgrails.war.copyToWebAppgrails.war.resources
grails.war.java5.dependencies 选项,因为Java 5.0现在已经是最低要求了(见上描述)。4) 缺省情况下,jsessionid(被认为是有害的)用法被禁止的。如果你的应用确实需要jsessionid,那么你可以通过在grails-app/conf/Config.groovy 中增加下述代码:grails.views.enable.jsessionid=truePlugin Changes
As of version 1.1, Grails no longer stores plugins inside yourPROJECT_HOME/plugins directory by default. This may result in compilation errors in your application unless you either re-install all your plugins or set the following property in grails-app/conf/BuildConfig.groovy:grails.project.plugins.dir="./plugins"插件的变化
在1.1版本中,Grails不再将PROJECT_HOME/plugins 目录作为缺省插件目录。这可能会导致你应用的编译错误,因此你需要将所有的插件重新安装或者在 grails-app/conf/BuildConfig.groovy 中设置如下选项:grails.project.plugins.dir="./plugins"Script Changes
1) If you were previously using Grails 1.0.3 or below the following syntax is no longer support for importing scripts from GRAILS_HOME:Ant.property(environment:"env") grailsHome = Ant.antProject.properties."env.GRAILS_HOME"includeTargets << new File("${grailsHome}/scripts/Bootstrap.groovy")
grailsScript method to import a named script:includeTargets << grailsScript("_GrailsBootstrap")Ant should be changed to ant.3) The root directory of the project is no longer on the classpath, so loading a resource like this will no longer work:def stream = getClass().classLoader.getResourceAsStream(
"grails-app/conf/my-config.xml")basedir property:new File("${basedir}/grails-app/conf/my-config.xml").withInputStream { stream -> // read the file }
脚本的变化
1) 如果你正在使用Grails 1.0.3或者更早的版本,那么如下从GRAILS_HOME中导入脚本的语法将不再被支持:Ant.property(environment:"env") grailsHome = Ant.antProject.properties."env.GRAILS_HOME"includeTargets << new File("${grailsHome}/scripts/Bootstrap.groovy")
grailsScript 方法来导入命名脚本:includeTargets << grailsScript("_GrailsBootstrap")Ant 的变量全部改为 ant 了。3) 工程的根目录不再是classpath的一部分,因此如下方式的加载资源将不再有效:def stream = getClass().classLoader.getResourceAsStream(
"grails-app/conf/my-config.xml")basedir 的方式来处理:new File("${basedir}/grails-app/conf/my-config.xml").withInputStream { stream -> // read the file }
Command Line Changes
Therun-app-https and run-war-https commands no longer exist and have been replaced by an argument to run-app:grails run-app -https
命令行的变化
run-app-https 和 run-war-https 命令不再支持,你可以通过run-app加参数方式来实现:grails run-app -https
Data Mapping Changes
1) Enum types are now mapped using their String value rather than the ordinal value. You can revert to the old behavior by changing your mapping as follows:static mapping = { someEnum enumType:"ordinal" }
数据映射的变化
1) 枚举类型(Enum)已经被映射为字符串值,而不是数值。不过你也可以通过如下的配置恢复到以前旧有的行为:static mapping = { someEnum enumType:"ordinal" }
REST Support
Incoming XML requests are now no longer automatically parsed. To enable parsing of REST requests you can do so using theparseRequest argument inside a URL mapping:"/book"(controller:"book",parseRequest:true)
resource argument, which enables parsing by default:"/book"(resource:"book")
支持REST
输入的XML请求不再被自动地解析,为了能够解析REST请求,你需要在URL映射中增加parseRequest 参数:"/book"(controller:"book",parseRequest:true)
resource 参数,其缺省情况下是解析的,如下:"/book"(resource:"book")
2.4 创建Grails应用
To create a Grails application you first need to familiarize yourself with the usage of the Run create-app to create an application:
在创建应用程序之前,先熟悉一下 grails command which is used in the following manner:grails [command name]
grails create-app helloworldcd helloworld
grails 命令的使用(grails中的命令都在终端中输入,请参考上面的讲解)。通常的方式如下:grails [command name]
grails create-app helloworldcd helloworld
2.5 Hello World示例
To implement the typical "hello world!" example Grails' interactive mode will be activated and you should see a prompt that looks like the following: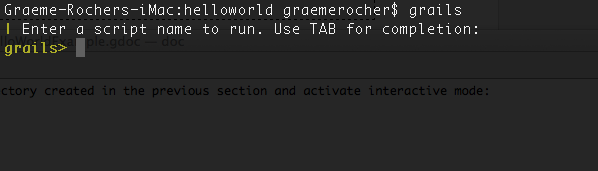 Now run the create-controller command:Job done. Now start-up the container with another new command called run-app:
 This is the Grails intro page which is rendered by the
为了完成这个经典的“hello world!”示例,我们需要先 cd into the directory created in the previous section and activate interactive mode:$ cd helloworld $ grails
Now run the create-controller command:
grails> create-controller hellograils-app/controllers directory called helloworld/HelloController.groovy.
If no package is specified with create-controller script, Grails automatically uses the application name as the package name. This default is configurable with the grails.project.groupId attribute in Config.groovy.
Controllers are capable of dealing with web requests and to fulfil the "hello world!" use case our implementation needs to look like the following:package helloworldclass HelloController { def world() { render "Hello World!" } }
grails> run-apphttp://localhost:8080/helloworldThe result will look something like the following screenshot:This is the Grails intro page which is rendered by the web-app/index.gsp file. You will note it has a detected the presence of your controller and clicking on the link to our controller we can see the text "Hello World!" printed to the browser window.
cd 到上一节所创建的"helloworld"目录下,并且激活交互模式,指令如下:$ cd helloworld $ grails
现在再来运行如下所示的 create-controller 命令:
grails> create-controller hellograils-app/controllers目录下边创建一个名字为 helloworld/HelloController.groovy 的控制器(更多信息请参考控制器章节)。
如果在create-controller命令中没有指定包名,那么Grails自动地将应用的名称作为包名.这个缺省配置是通过Config.groovy文件中地 grails.project.groupId 属性来指定地。
控制器主要用来完成对Web请求的处理,为了能够实现"hello world!"示例,我们的实现代码如下:package helloworldclass HelloController { def world() { render "Hello World!" } }
grails> run-apphttp://localhost:8080/helloworld 来访问应用。其显示结果如下图所示:上图是Grails的 web-app/index.gsp 文件所生成的简介页面,你还会看到系统自动检测到的现有控制器,点击它,你将会看到"Hello World!"显示在浏览器窗口。
2.6 使用交互模式
Grails 2.0 features an interactive mode which makes command execution faster since the JVM doesn't have to be restarted for each command. To use interactive mode simple type 'grails' from the root of any projects and use TAB completion to get a list of available commands. See the screenshot below for an example: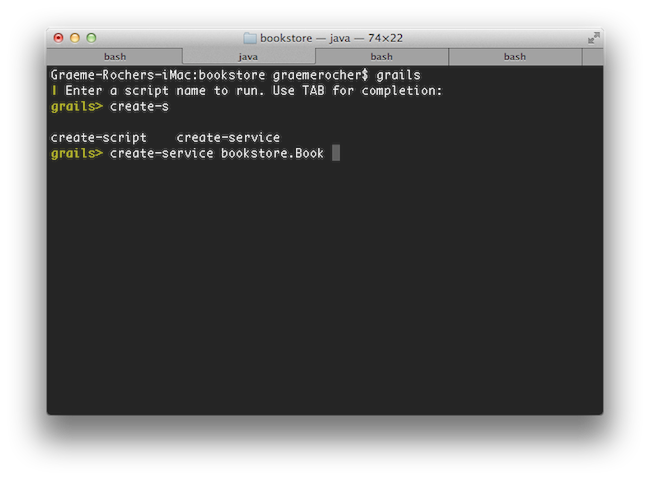 For more information on the capabilities of interactive mode refer to the section on Interactive Mode in the user guide.
Grails 2.0的交互模式可以让命令执行的更快,因为每个命令无需再重新启动JVM了。要使用交互模式,只需要在工程的根目录下输入'grails',然后使用TAB键可以得到一个有效的命令列表,如下图所示:For more information on the capabilities of interactive mode refer to the section on Interactive Mode in the user guide.
更多交互模式的功能请参考本手册的交互模式章节。
2.7 IDE设置
IntelliJ IDEA
IntelliJ IDEA and the JetGroovy plugin offer good support for Groovy and Grails developers. Refer to the section on Groovy and Grails support on the JetBrains website for a feature overview.To integrate Grails with IntelliJ run the following command to generate appropriate project files:grails integrate-with --intellij
IntelliJ IDEA
IntelliJ IDEA和JetGroovy插件为Groovy和Grails的开发提供了非常棒的支持。 JetBrains所支持的特性概览,请参考其Groovy和Grails章节。在Grails中集成IntelliJ,只需要运行如下命令来生成其合适的工程文件即可:grails integrate-with --intellij
Eclipse
We recommend that users of Eclipse looking to develop Grails application take a look at SpringSource Tool Suite, which offers built in support for Grails including automatic classpath management, a GSP editor and quick access to Grails commands. See the STS Integration page for an overview.Eclipse
对使用 Eclipse 来开发Grails应用的用户,我们建议了解一下SpringSource工具集(STS),其内置了对Grails支持,比如自动classpath管理、GSP编辑器以及快速的Grails命令访问。 集成STS页面中有其概况介绍。NetBeans
NetBeans provides a Groovy/Grails plugin that automatically recognizes Grails projects and provides the ability to run Grails applications in the IDE, code completion and integration with the Glassfish server. For an overview of features see the NetBeans Integration guide on the Grails website which was written by the NetBeans team.NetBeans
NetBeans下的Groovy/Grails插件,能够自动识别Grails工程、直接在IDE中运行Grails应用。代码补全以及自动跟Glassfish容器集成。NetBeans团队还在Grails官方网站介绍了集成NetBeans概况。TextMate
Since Grails' focus is on simplicity it is often possible to utilize more simple editors and TextMate on the Mac has an excellent Groovy/Grails bundle available from the Texmate bundles SVN.To integrate Grails with TextMate run the following command to generate appropriate project files:grails integrate-with --textmate
mate .
TextMate
因为Grails一直关注其简单性,因此很简单的编辑器也可以来开发其应用。Mac下的 TextMate 就有很优秀的Groovy/Grails bundle,已经直接在其官方Texmate bundles SVN中了。要在Grails中集成TextMate,只需要运行如下命令来生成其合适的工程文件即可:grails integrate-with --textmate
mate .
2.8 规约配置
Grails uses "convention over configuration" to configure itself. This typically means that the name and location of files is used instead of explicit configuration, hence you need to familiarize yourself with the directory structure provided by Grails.Here is a breakdown and links to the relevant sections:
Grails中的配置遵循“规约优于配置”的原则,即通过文件的名称和位置来替代显式的配置,因此需要熟悉以下几个目录结构的用途。此处仅为一个简单的分解,详细请参考相关章节:
grails-app- top level directory for Groovy sourcesconf- Configuration sources.controllers- Web controllers - The C in MVC.domain- The application domain.i18n- Support for internationalization (i18n).services- The service layer.taglib- Tag libraries.utils- Grails specific utilities.views- Groovy Server Pages - The V in MVC.scripts- Gant scripts.src- Supporting sourcesgroovy- Other Groovy sourcesjava- Other Java sourcestest- Unit and integration tests.
grails-app- Groovy源文件的顶级目录conf- 配置.controllers- Web控制器 - MVC中的C(控制器).domain- 领域模型.i18n- 国际化(i18n)支持.services- 服务层.taglib- 标签库.utils- Grails相关的工具类.views- Groovy服务器页面(GSP) - MVC中的V(视图).scripts- Gant脚本.src- 源文件目录groovy- 其他的Groovy源文件java- 其他的Java源文件test- 单元和集成测试.
2.9 运行应用
Grails applications can be run with the built in Tomcat server using the run-app command which will load a server on port 8080 by default:You can specify a different port by using the Note that it is better to start up the application in interactive mode since a container restart is much quicker:More information on the run-app command can be found in the reference guide.
run-app命令使用内置的端口为8080的Tomcat容器来运行Grails应用,比如:grails run-app
server.port argument:grails -Dserver.port=8090 run-app
$ grails
grails> run-app
| Server running. Browse to http://localhost:8080/helloworld
| Application loaded in interactive mode. Type 'exit' to shutdown.
| Downloading: plugins-list.xml
grails> exit
| Stopping Grails server
grails> run-app
| Server running. Browse to http://localhost:8080/helloworld
| Application loaded in interactive mode. Type 'exit' to shutdown.
| Downloading: plugins-list.xml
grails run-app
server.port 参数来指定不同的端口,比如:grails -Dserver.port=8090 run-app
$ grails
grails> run-app
| Server running. Browse to http://localhost:8080/helloworld
| Application loaded in interactive mode. Type 'exit' to shutdown.
| Downloading: plugins-list.xml
grails> exit
| Stopping Grails server
grails> run-app
| Server running. Browse to http://localhost:8080/helloworld
| Application loaded in interactive mode. Type 'exit' to shutdown.
| Downloading: plugins-list.xml
2.10 测试应用
The
那些 create-* commands in Grails automatically create unit or integration tests for you within the test/unit or test/integration directory. It is of course up to you to populate these tests with valid test logic, information on which can be found in the section on Testing.To execute tests you run the test-app command as follows:grails test-app
create-* 命令将会在你的 test/unit 或者 test/integration 目录下自动创建单元或者集成测试,当然了,这些验证这些测试的逻辑还是需要你来处理的,更多信息可以在测试章节中找到。执行这些测试,只需要输入test-app命令即可,比如:grails test-app
2.11 部署应用
Grails applications are deployed as Web Application Archives (WAR files), and Grails includes the war command for performing this task:This will produce a WAR file under the
Grails应用程序以Web应用归档(WAR)文件的形式进行部署,因此Grails提供了war命令,执行如下命令:grails war
target directory which can then be deployed as per your container's instructions.Unlike most scripts which default to the development environment unless overridden, the war command runs in the production environment by default. You can override this like any script by specifying the environment name, for example:grails dev war
NEVER deploy Grails using the run-app command as this command sets Grails up for auto-reloading at runtime which has a severe performance and scalability implicationsWhen deploying Grails you should always run your containers JVM with the
-server option and with sufficient memory allocation. A good set of VM flags would be:-server -Xmx512M -XX:MaxPermSize=256m
grails war
target 目录下产生一个WAR文件,可以根据不同的服务器容器进行相应地部署。跟运行在 development 环境下的大多数其他命令脚本不同, war 命令缺省是运行在 production 环境中的,当然,你也可以通过指定环境名称的方式来覆盖任意脚本缺省环境,比如:grails dev war
一定不要使用run-app命令来部署Grails,因为此命令会在运行时自动加载,这样会对服务器的性能和可扩展性有严重影响。部署Grails的时候,你要确保你容器的JVM总是使用
-server 选项,并且还有有足够的内存。推荐的VM参数如下:-server -Xmx512M -XX:MaxPermSize=256m
2.12 所支持的Java EE容器
Grails runs on any container that supports Servlet 2.5 and above and is known to work on the following specific container products:
Grails可以运行于任何支持Servlet 2.5及其以上的容器,以下这些特定容器已经测试可以工作:
- Tomcat 7
- Tomcat 6
- SpringSource tc Server
- Eclipse Virgo
- GlassFish 3
- GlassFish 2
- Resin 4
- Resin 3
- JBoss 6
- JBoss 5
- Jetty 7
- Jetty 6
- IBM Websphere 7.0
- IBM Websphere 6.1
- Oracle Weblogic 10.3
- Oracle Weblogic 10
- Oracle Weblogic 9
- Tomcat 7
- Tomcat 6
- SpringSource tc Server
- Eclipse Virgo
- GlassFish 3
- GlassFish 2
- Resin 4
- Resin 3
- JBoss 6
- JBoss 5
- Jetty 7
- Jetty 6
- IBM Websphere 7.0
- IBM Websphere 6.1
- Oracle Weblogic 10.3
- Oracle Weblogic 10
- Oracle Weblogic 9
2.13 生成应用
To get started quickly with Grails it is often useful to use a feature called Scaffolding to generate the skeleton of an application. To do this use one of the
在创建完Grails应用后,通常会使用脚手架来生成整个应用程序的骨架。这是通过使用 generate-* commands such as generate-all, which will generate a controller (and its unit test) and the associated views:grails generate-all Book
generate-* 命令来完成的,例如使用generate-all命令来生成控制器(包括单元测试)及相应视图grails generate-all Book
2.14 创建工件
Grails ships with a few convenience targets such as create-controller, create-domain-class and so on that will create Controllers and different artefact types for you.
This will result in the creation of a domain class at There are many such
Grails还为我们提供了像create-controller、 create-domain-class等命令,以方便地创建控制器和其他的工件类型。
These are just for your convenience and you can just as easily use an IDE or your favourite text editor.For example to create the basis of an application you typically need a domain model:
grails create-domain-class book
grails-app/domain/Book.groovy such as:class Book {
}create-* commands that can be explored in the command line reference guide.To decrease the amount of time it takes to run Grails scripts, use the interactive mode.
这些仅仅是方便而已,你依然可以轻松的使用IDE或者你自己喜爱的文本编辑器(比如记事本、TextMate、VIM等--译者注)。以创建一个基本的应用为例,你通常至少需要一个领域模型,比如:
grails create-domain-class book
grails-app/domain/Book.groovy 中创建一个如下所示的领域类:class Book {
}create-* 命令。为了减少Grails脚本的运行时间,请使用commandLine模式。