Sign Up for a Trial and Get Hosted Elasticsearch!
This tutorial will walk you though how to sign up for a trial and get started using Elastic Cloud.
What is Included in the Trial?
The free trial includes one cluster with a total of 1GB memory, 24GB storage, and high availability (HA) across two data centers.
How many documents? As many as you can fit in that node. This will of course be dependent on document size and what kind of queries you execute. You may also choose any of the official plugins that are listed in the Elastic Cloud Console.
Should you want to enable dynamic scripts, we ask that you either register a credit card on the Elastic Cloud console or visit the support page for help. This is simply because we don’t want to run your code without knowing who you are. More background on this choice is available in this article.
How to Sign Up
The signup process is really simple and straightforward. All that is required is an email address. A credit card is optional for the trial and may be added at any time later.
- Got to our Elastic Cloud Trial page.
- Fill in your email address and click Start Free Trial after taking a peek at the legal terms.
- Go and check your mailbox and click on the link in the email. If you haven’t received the email within a few minutes then remember to check your spam folder.
You will be asked to set a password for your account. Once this is done you will be signed in to the Elastic Cloud Console.
Create Your First Cluster
- Log into the Elastic Cloud Console, if you aren’t logged in already.
Select Clusters at the top and then click New Cluster. You can now start to configure your cluster:
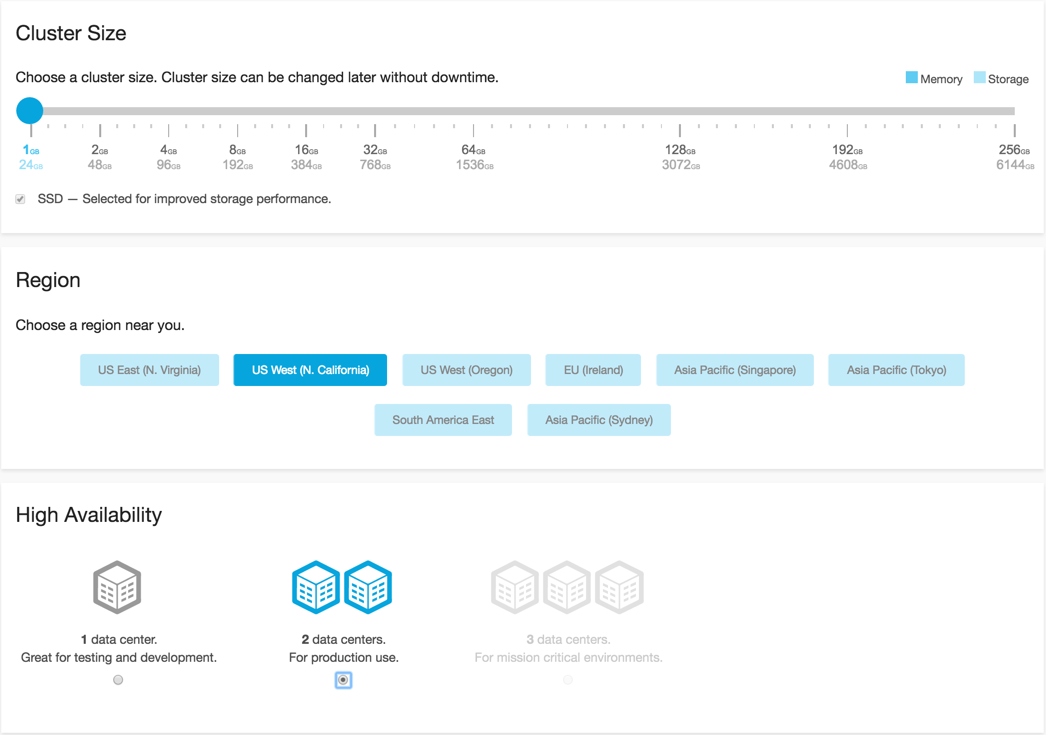
- Set the cluster size. During the free trial period, you get access to provision one cluster with 1GB memory, and 24GB storage.
Choose a region close to you.

The region cannot be changed after the cluster has been created, so pick the one that you think works best for you, say, the region closest to you.
- Select level of fault tolerance. The trial includes high availability (HA) across two zones, that is, across 2 data centers.
- Select the Elasticsearch version. The default version is the latest, stable version. You can always upgrade versions, but you will not be able to downgrade once your cluster is up and running.
- We strongly recommend disabling dynamic scripts (default selection). Your other options are to enable sandboxed dynamic scripts or dynamic scripts. Read more about dynamic scripts here: Elasticsearch Security - Scripting for Fun and Profit.
- Select number of shards. The default is 1. We recommend that you read Sizing Elasticsearch before your change the number of shards.
- Choose whether you want to enable or disable automatic index creation.
- Choose to either require explicit name for deletions or allow wildcards.
- Optional: Select from the list of available plugins.
-
Optional: Specify any whitelisted user settings that should be added to
elasticsearch.yml. - Optional: If you have are on a paid subscription and already have other clusters, you can restore a snapshot from another cluster to your new cluster.
- Optional: Name your cluster.
Click on the Create Cluster button. Your cluster will be up and running shortly.
If you created your first cluster on Elasticsearch 5.0 or later, the X-Pack security features are always enabled and a window will pop up with the password for the
elasticuser. Make sure you copy down this password, as you will need it when connecting to your cluster. If you didn’t copy it, you can reset the password later. Note that you can’t change the generated password, you can only reset it. If you need additional users, you will be able to create them in the Kibana Management app for X-Pack later.
After provisioning of your new cluster is complete, you are redirected to the Overview page for your new cluster:
![A newly created cluster in the https://cloud.elastic.co/[Elastic Cloud Console]](images/my-first-cluster.png)
You can tell there are a couple of things that need your attention soon: The security features needs to be enabled (on versions before 5.0) and you probably want to enable Kibana, because it’s a great tool for analyzing any type of data stored in Elasticsearch. If you are new to the Elastic Stack, we suggest you hold off for a bit and try connecting to your cluster in the next section first. (If you already enabled the security features or created a version 5.x cluster, don’t worry, we show you how to include authentication details when connecting to your cluster later on. Using authentication is a good thing.)
Before you move on, take note of the links available from the Overview page: Many of the tasks that are described elsewhere in the Elastic Cloud documentation are accessible from these links. For example, to change your cluster later on, simply select Configuration in the sidebar (to learn more about the various configuration parameters, see Cluster Configuration). To work with users and roles, go to Security (in version 5.0 and later, the page links you to the Management app in Kibana). Note that some options are available only if you are on a specific subscription level.
Connect to Your Cluster
From the Overview page for your new cluster in the Elastic Cloud Console, you can click one of the URLs under Endpoints and connect to the cluster in your browser. You should get see a standard message like this:
{
  "name" : "instance-0000000000",
  "cluster_name" : "85943ce00a934471cb971009e73d2d39",
  "cluster_uuid" : "0z2PsOX1TCGSk7PKgB9ajg",
  "version" : {
    "number" : "2.4.1",
    "build_hash" : "c67dc32e24162035d18d6fe1e952c4cbcbe79d16",
    "build_timestamp" : "2016-09-27T18:57:55Z",
    "build_snapshot" : false,
    "lucene_version" : "5.5.2"
  },
  "tagline" : "You Know, for Search"
}
There are many ways of connecting to an Elasticsearch cluster and we do our best to support them all. Currently we support:
- RESTful API with JSON over HTTP and HTTPS
Used by the
curlcommand and most programming languages that aren’t Java. To interact with your cluster, use your Elasticsearch cluster endpoint information from the Overview page in the Elastic Cloud Console. Port 9200 is used for HTTP connections, ports 9243 and 443 are used for HTTPS. Using HTTPS is generally recommended, as it is more secure.If this is your first time using Elasticsearch, you can try out some
curlcommands to become familiar with the basics. If you’re on an operating system like macOS or Linux, you probably already have thecurlcommand installed. For example, to connect to your cluster from the command line over HTTPS with thecurlcommand:curl https://85943ce00a934471cb971009e73d2d39.us-east-1.aws.found.io:9243 { "name" : "instance-0000000000", "cluster_name" : "85943ce00a934471cb971009e73d2d39", "cluster_uuid" : "0z2PsOX1TCGSk7PKgB9ajg", "version" : { "number" : "2.4.1", "build_hash" : "c67dc32e24162035d18d6fe1e952c4cbcbe79d16", "build_timestamp" : "2016-09-27T18:57:55Z", "build_snapshot" : false, "lucene_version" : "5.5.2" }, "tagline" : "You Know, for Search"To make this
curlcommand work with your cluster, you need to replace the cluster ID85943ce00a934471cb971009e73d2d39and the regionus-east-1.awswith the right values from your own endpoint URL. The cluster shown in the example is not publicly accessible. +TIP: If you created a cluster on Elasticsearch 5.0 or later or if you already enabled the security features, you must include authentication details with the -u parameter. For example:curl -u elastic:W0UN0Rh9WX8eKeN69grVk3bX https://85943ce00a934471cb971009e73d2d39.us-east-1.aws.found.io:9243.There is a Quickstart guide in the Cloud console with additional examples that you can copy into your shell to index and retrieve documents in Elasticsearch, for example. Once you experiment with slightly bigger queries, you might also want to try something that is a little more syntax aware. Some popular choices are:
- Kibana, a great tool for analyzing any type of data stored in Elasticsearch, has grown to include Console, which is useful for interacting with the REST API of Elasticsearch (for version 5.0 and later). In versions before 5.0, Console is called Sense.
- The query editor in Kopf
- Elastic-hammer, a web front-end for Elasticsearch.
- Java transport client
A good choice if your applications are using Java. This lighter-weight transport client forwards requests to a remote cluster over port 9300, using the native Elasticsearch transport protocol.
To learn more about how you can use the Java transport client, typically in conjunction with X-Pack security features or Shield, see Configure the Java Transport Client. There is also an older plugin that is now deprecated.
Enable Shield
For versions before 5.0: In the previous section, you were able to connect to your cluster without including any authentication information, because Shield was not yet enabled, but you don’t really want to leave your cluster unsecured for any length of time. If you don’t secure your cluster, anyone can connect to it, which is why you got a security warning for your new cluster.
To enable security features for clusters with Elasticsearch versions before 5.0: Log into the Elastic Cloud Console, go to the Overview page for your cluster and click Security. Let the UI guide you through the steps for enabling security. After you enable the security features, interacting with your cluster requires that you provide authentication credentials, so don’t forget to write down the passwords for the users IDs you create and keep them in a secure location.
If you created your first cluster on Elasticsearch 5.0 or later, the X-Pack security features are always enabled, and there is no additional enablement step.
To learn more about using the security features in Elastic Cloud, see Securing Your Cluster.
Enable Kibana
You get Kibana for free with every cluster you create. To enable Kibana on your cluster:
- For Elasticsearch versions before 5.0: Make sure you have Shield enabled.
- Go to the Configuration page for your cluster and select Enable in the Kibana section.
- Click Update. This will provide you with a new URL, which gives you access to Kibana. It can take a couple of seconds to get ready right after you click Enable, so if you get an error message, try again in a couple of seconds.
You will need to provide the Kibana endpoint with credentials that can be used to access the necessary Elasticsearch resources. This means granting read access to the necessary indexes, as well as access to update the .kibana index.
Reporting
For Elasticsearch 2.4 and later: Reporting is available in Elastic Cloud and enables you generate reports that contain Kibana dashboards, visualizations, and saved searches. For more information, see getting started with reporting.
Dashboards
We provide access to several Elasticsearch dashboards - hosted directly from our proxy - including Kopf and Kibana.
The Next Step: Add a Credit Card
To add or change credit card:
- Click your Account in the top right corner, and select Billing details in the drop down menu.
Fill in your billing details and click Update.
Your credit card information is sent securely to our billing provider and stored with them.
Your credit card will not be charged, unless you increase the capacity beyond the free trial offer or you add a third data center, or the trial expires while the cluster is still running. To stop being charged for a cluster, delete the cluster at the bottom of the Configuration page.
Happy Searching and Further Reading!
- Blog - Read up on articles targeting both beginners and experienced users.