Elastic Cloud supports most of the security features that are part of the Elastic Stack. These features are designed to:
- Prevent unauthorized access with password protection, and role-based access control.
- Preserve the integrity of your data with message authentication and SSL/TLS encryption.
Elastic Cloud handles the installation of the security features for you, both for new clusters you create and for clusters that you upgrade. Which exact set of security features you use depends on the version of your Elasticsearch cluster.
In Elasticsearch version 5.0 and later, the security features to keep your Elastic Cloud clusters safe are now part of X-Pack. With the move to X-Pack, the biggest changes to security features for the Elastic Stack include the names of the security configuration options, TLS/SSL configuration, and how roles are defined. A few privileges have also been removed. You work with users and roles in the Kibana Management app, accessible from the Security page in the Elastic Cloud Console. On Elastic Cloud, two users are always created with new version 5.0 clusters, the elastic superuser and the anonymous user. If you upgrade a cluster to version 5.0, the users defined in your Shield configuration are also preserved.
For Elasticsearch versions before 5.0, the Shield plugin provides similar security features for your cluster, such as user authentication and role based access control. Shield is always installed, but you must save your Shield configuration to enable the security features. If you don’t enable Shield, anyone who knows the ID of your cluster can connect to it. You work with users and roles in the Shield Editor directly in the Elastic Cloud Console. On Elastic Cloud, three users are always created: The admin user, the readwrite user, and the readonly user.
Note that when you upgrade a cluster to Elasticsearch 5.0 or later from an earlier version of Elasticsearch, your Shield configuration is migrated to X-Pack. If you used the Shield Editor before upgrading to version 5.0, you will need to switch to the Kibana Management app after upgrading.
In Elasticsearch 5.0 and later, you work with users and roles in the Kibana Management app. If you’re using a version of Elasticsearch before 5.0, you use the Shield Editor to work with users and roles.
For a more extensive security discussion, please read Securing Your Elasticsearch Cluster, which covers several important aspects of securing Elasticsearch in addition to authentication and authorization. You can also take a look at the security section of Elasticsearch in Production.
Enable Shield
For versions before 5.0: You should enable Shield on all clusters that you create. If your cluster does not have Shield enabled, anyone who knows the ID of your cluster can access it. By default, when you create a new cluster, the Shield plugin is installed, but it is not enabled.
To enable Shield:
- Log into the Elastic Cloud Console and go to the Security page for the cluster that needs to have Shield enabled.
In the Shield Editor, review the users and roles that will be created and copy down the passwords. Keep the passwords in a secure location.
By default, three users are always created: The
adminuser, thereadwriteuser, and thereadonlyuser. If you are new to Shield, you can accept these default users for now and manage your own users later.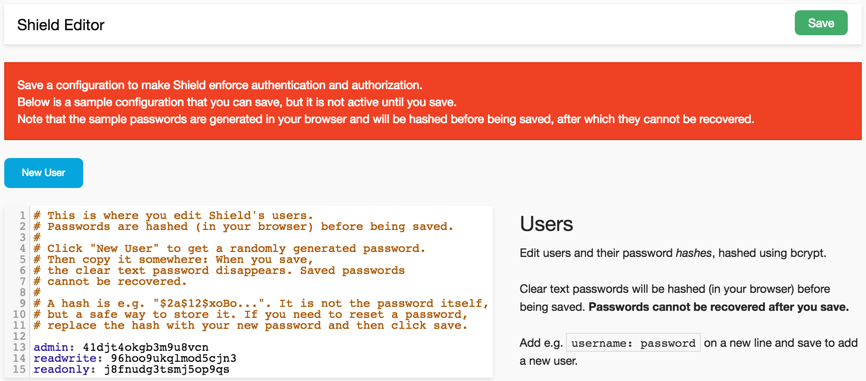
Click Save to hash the passwords, save the configuration, and enable Shield.
When you save the configuration, the passwords are hashed and you will not be able to recover them afterwards. If you ever need to reset a password, replace the corresponding hash with your new password and then save the configuration again.
After Shield is enabled, users and applications can connect to your cluster only if they can authenticate successfully.
If you are not sure how enabling Shield will affect your cluster, you can also clone an unsecured cluster, enable Shield on the new cluster, and test there before updating or completely replacing your existing cluster.
Reset the elastic User Password
For versions 5.0 and later: You might need to reset the password for the elastic superuser if you cannot authenticate with the elastic user ID and are effectively locked out from a cluster. For example, if your cluster never had an active Shield configuration and you upgraded to Elasticsearch 5.0 or if you were not provided the password during the upgrade process, you will likely need to reset the password.
To reset the password:
- Log into the Elastic Cloud Console and click Security.
- Click Reset.
Copy down the auto-generated a password for the
elasticuser: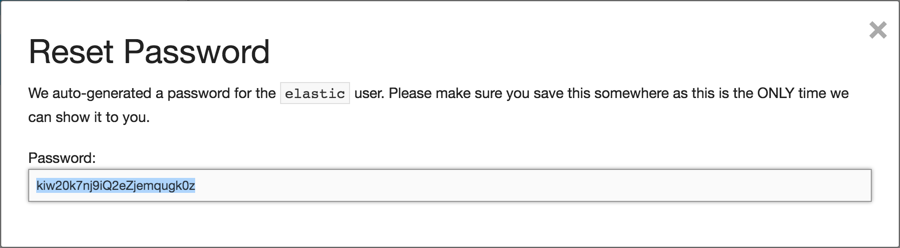
- Close the window.
The password is not accessible after you close the window, so if you lose it, you need to reset the password again.
Manage Users and Roles in X-Pack
For versions 5.0 and later: You work with users and roles in the Kibana Management app, accessible from the Security page in the Elastic Cloud Console or directly from the Kibana side navigation.
The Users tab shows the users that have been defined on your cluster. You can add or delete users here and assign roles that give users specific privileges. A user can hold several roles.
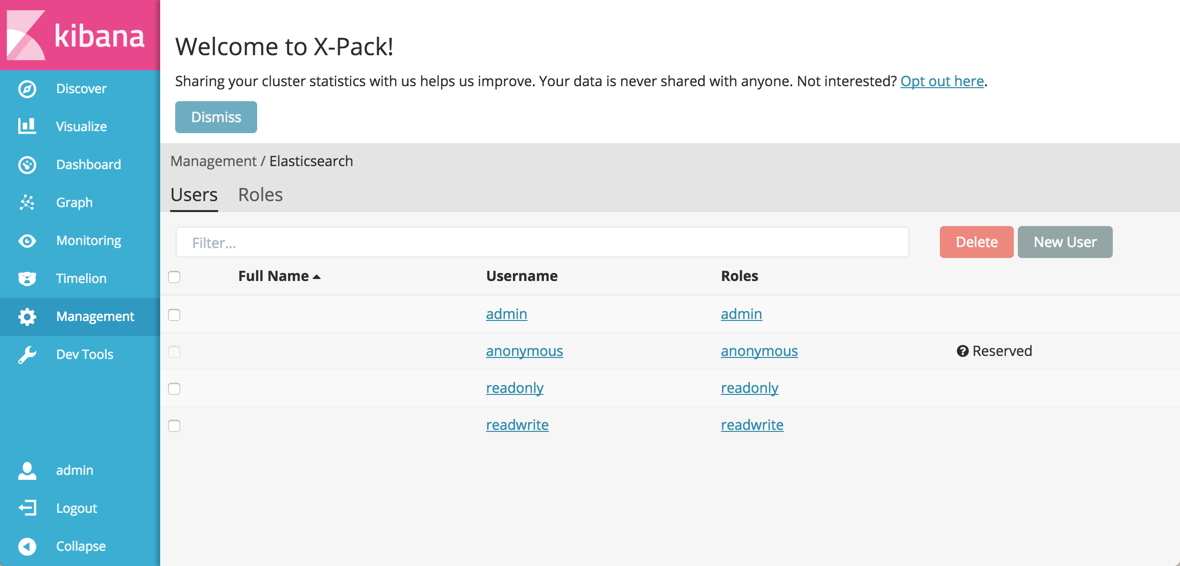
If you upgraded a cluster to Elasticsearch 5.0 or later from a version before 5.0, the users defined in your Shield were also migrated to X-Pack and show up in this list. This includes the default admin, readwrite, and readonly users, which you can work with like any other user in the Kibana Management app.
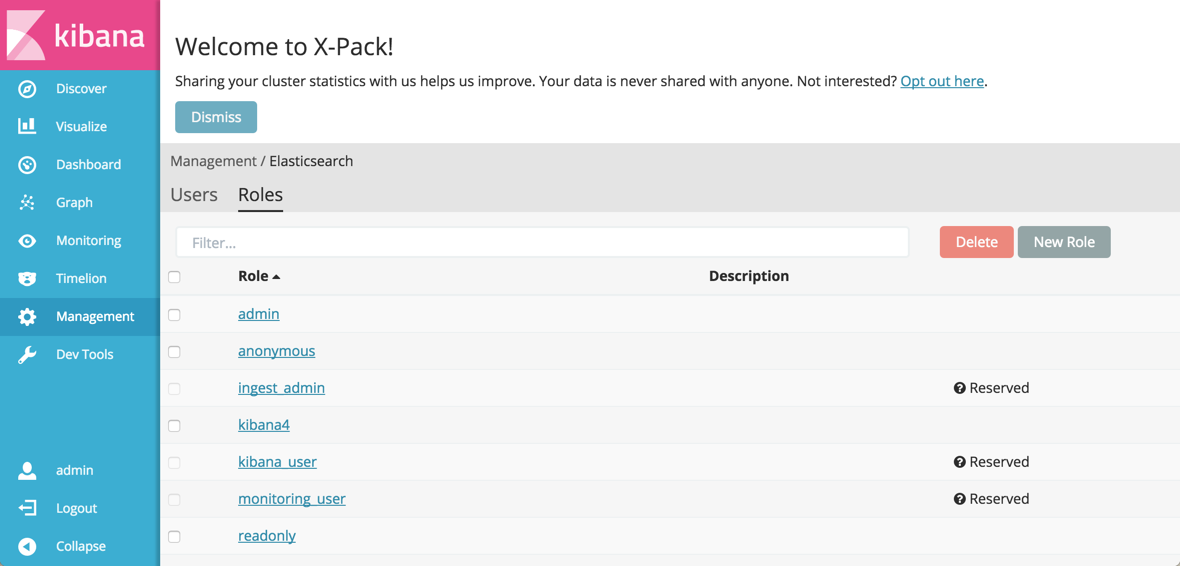
The Roles tab shows the roles that exist on your cluster. Roles let you customize exactly which actions a user with the role can do, both on a cluster and an index level. Several users can have the same role. You can also add or delete users
Two users are always created with new version 5.0 clusters:
-
elastic -
A superuser that is somewhat similar in scope to the default
adminuser in Shield configurations on Elastic Cloud before version 5.0. Theelasticuser is not shown in the Kibana Management app and you cannot modify this user, other than to reset the password. -
anonymous - A user for handling incoming requests where no authentication token can be extracted. By default, this user has no privileges. You need to assign one or more roles to this user to enable anonymous access. To learn more, see Enabling Anonymous Access.
To learn more about users and roles in X-Pack, see Setting Up User Authentication.
Example: Create a Filebeat Role and User
To send Beats data to a secured cluster in Elastic Cloud, you should use a user that has the right privileges. When we showed you a Beats example that configured Filebeat on a server to send data to Elastic Cloud, the user filebeat_internal was used, with role privileges based on the recommendations in Beats and Security.
To create a similar user and role in the Management app in Kibana:
- Log into the Elastic Cloud Console and open the Kibana Management app, accessible from the Security page.
-
Select the Roles tab, click New Role and give the role the
filebeat-writername. Specify the right privileges. Under Cluster Privileges, select
monitorandmanage_index_templates. Under Indeces Privileges, specifyread,write, andcreate_indexprivileges for thefilebeat-*indices that the Beat creates.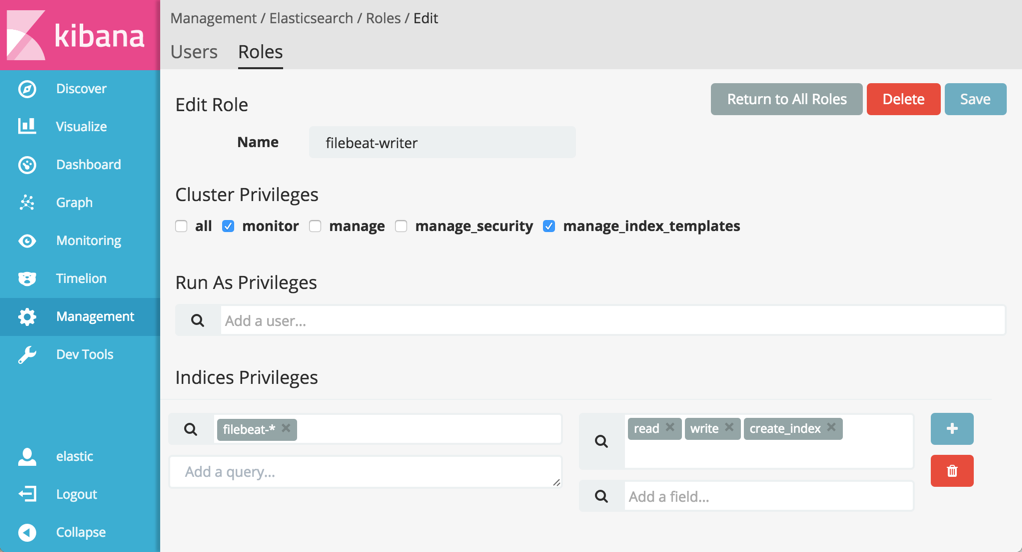
- Click Save.
-
Select the Users tab, click New User and give the user the
filebeat_internalname. Assign the
filebeat-writerrole to the user under Roles.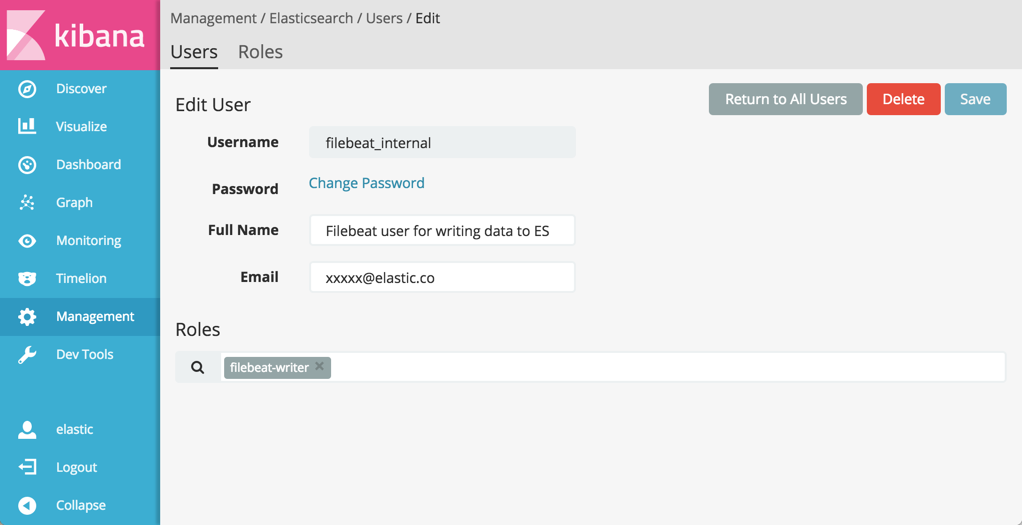
- Enter a password and confirm the password. Make a note of the password and keep it in a secure location.
- Click Save.
After the user and role are saved, you can use the new user to authenticate when sending data from Filebeat to your cluster.
Manage Users and Roles in Shield
For versions before 5.0: You configure users, their roles, and the roles themselves in the Shield Editor, accessible from the Security page for each cluster. The Shield Editor works on YAML files, so you can add comments where necessary.

A valid role or user name must be at least 1 character and no longer than 30 characters. It must begin with a letter
(a-z) or an underscore (_). Subsequent characters can be letters, underscores (_), digits (0-9) or any
of the following symbols @, -, . or $
Users
The Users editor defines the users in your cluster. A user has a username and a password hash. You define a new user by adding a new line with the username mapping your clear text password. When you save, the password is hashed in your browser before being saved to our servers.
You can click on New User to have a new user added to the file with a randomly generated password. Copy this password before saving, as there is no way to access the password after it has been hashed. If you lose the password, just change it to a new one.
If you run Shield in a cluster running on your own servers, you can simply copy the config/shield/users file and paste it in this editor.
This is an example of a valid users file:
# Lines starting with # are comments.
# This file expects usernames to map passwords or hashes, like the following:
admin: $2a$12$uRopB3Jz3slQQVMUTlNuPeHRhbfbFWDBrXhRk8vzK7xr0mavw2vAq
readwrite: $2a$12$Y/tCEs7RSzWrlWsjyyuB2.ARhuMis5PXj47IXvrDED/jJ8Cx1dKza
readonly: $2a$12$DQ8jiYAHiCvHWkmNM2fOgOsXgwZxsl/4PxY6zr5g5BOYRcG8dV9IW

# This password has not been hashed yet, but will be when you save.
my_user: bc3rqc0q1xwr4irq3o
To delete a user, simply remove it from this file.
Users per Role
A user can have several roles, and a role can have several users.
The Users per Role editor lets you customize these. The format is one line per role, with the role name followed by a comma delimited list of users.
# The users per role file maps roles and users like this:
# role_name: user1, user2

readonly: user1, user2
my_custom_role: user2, user3

# In this case, user2 will have the roles readonly and my_custom_role
Roles
The Roles editor lets you customize exactly which actions users with the role can do, both on a cluster and an index level.
Full documentation on configuring role-based access control is available in the Shield documentation.
You can use the default roles or adapt them. Here are two examples of roles with comments that indicate what permissions these roles grant:
# Admins can do everything
admin:
  # If you use a generic group of actions, such as "all", "read", "monitor", etc.
  # you can simply specify the group without listing every action.
  cluster: all
  indices:
    # The same is true for indices. You can also list aliases here.
    # Note that the index name '*' is quoted. This is because this is actually
    # a YAML file, and the * character can have a special meaning. It is a good
    # practice to quote all the index names.
    '*': all

# This is an example of a role with more granular access. We explicitly list
# every action possible, both on the cluster and the indicies.
# A user with this role will be able to use Kibana 4 and read the indices
# logs-* and even-more-logs-*. Dashboards/Visualizations can be modified
# but the indices being analyzed can only be read.
kibana4:
  cluster:
      - cluster:monitor/nodes/info
      - cluster:monitor/health
      # Note that we use a list here. Every action is indented and
      # starts with `- `.
  indices:
    #
    'logs-*,even-more-logs-*':
      - indices:admin/mappings/fields/get
      - indices:admin/validate/query
      - indices:data/read/search
      - indices:data/read/msearch
      - indices:admin/get
    '.kibana':
      - indices:admin/exists
      - indices:admin/mapping/put
      - indices:admin/mappings/fields/get
      - indices:admin/refresh
      - indices:admin/validate/query
      - indices:data/read/get
      - indices:data/read/mget
      - indices:data/read/search
      - indices:data/write/delete
      - indices:data/write/index
      - indices:data/write/update
      - indices:admin/create
Configure the Java Transport Client
You can connect to a Shield protected cluster using the transport client. This is fully documented in Shield’s documentation.
The only addition you need when using Elastic Cloud is to add a header indicating which cluster to route the connections to.
Here is an example of how to create a transport client to connect to Elastic Cloud:
// Build the settings for our client.
String clusterId = "ac01aa2425e4a5bafdebf5100af3e9b37401055b"; // Your cluster ID here
String region = "us-east-1"; // Your region here
boolean enableSsl = true;

Settings settings = Settings.settingsBuilder()
    .put("transport.ping_schedule", "5s")
    //.put("transport.sniff", false) // Disabled by default and *must* be disabled.
    .put("cluster.name", clusterId)
    .put("action.bulk.compress", false)
    .put("shield.transport.ssl", enableSsl)
    .put("request.headers.X-Found-Cluster", clusterId)
    .put("shield.user", "username:password") // your shield username and password
    .build();

String hostname = clusterId + "." + region + ".aws.found.io";
// Instantiate a TransportClient and add the cluster to the list of addresses to connect to.
// Only port 9343 (SSL-encrypted) is currently supported.
Client client = TransportClient.builder()
        .addPlugin(ShieldPlugin.class)
        .settings(settings)
        .build()
        .addTransportAddress(new InetSocketTransportAddress(InetAddress.getByName(hostname), 9343));
The example is for an ES 2.1 cluster. See GitHub for examples that work with other versions.
You need to add the Shield JAR to your classpath. Examples of how to do this with various build systems are available in the Shield documentation.
Sanitize Requests
You must take care when sanitizing requests:
- Arbitrary keys must not be allowed if dynamic mapping is on.
- Index names can contain patterns.
-
Expensive searches can cause
OutOfMemoryerrors.
Legacy Access Control (Removed)
Previously, we provided security using the legacy Found access control. This ACL-based feature was sunset on December 1st, 2015. We now use X-Pack security features in version 5.0 and later and Shield in versions before 5.0 to provide security to all Elastic Cloud clusters. X-Pack security features and Shield are easier to use and can be used with both the REST API and the Java transport clients.
Restrictions
- IP filtering with X-Pack and Shield is currently not available.
-
Only the
esusersrealm is available. We currently do not support realms such as LDAP, Active Directory or Shield custom realms. - Audit Logging is disabled.
- Client certificates, such as PKI certificates, are not supported.